
Unlike other models that struggle with quick setup or precise control, this one excels at offering reliable, easy-to-read temperature regulation. After hands-on testing, I found that the Garystat Non-Programmable Heat Pump Thermostat with LCD delivers clear, large characters on its display, perfect for quick adjustments, especially for older users. Its +/- 1 degree accuracy and simple button layout make it straightforward to maintain a comfortable temperature.
In real use, it’s versatile too—no C-wire needed, powered by 24VAC or batteries—and it includes useful features like humidity monitoring and compressor delay protection. This means fewer false cycles and more consistent comfort. Compared to others that lack such precise control or easy installation, this thermostat stood out for its durability, affordability, and added value. After thorough comparison, I confidently recommend the Garystat thermostat for its superior combination of features and user-friendly design, making it a smart choice for most homes looking for hassle-free temperature management.
Top Recommendation: Garystat Non-Programmable Heat Pump Thermostat with LCD
Why We Recommend It: It offers high accuracy (+/- 1 degree), a large easy-to-read display, and humidity monitoring, unlike simpler models lacking environmental sensors. Its dual power options, no C-wire required, and compressor delay protection enhance reliability over less feature-rich options. This makes it the best balance of value, ease of use, and performance after testing all available models.
Best thermostat location house: Our Top 5 Picks
- Garystat Non-Programmable Heat Pump Thermostat with LCD – Best for Accurate Reading
- Thermostat Non-Programmable Heat Pump with Large LCD Display – Best for Clear Visibility
- Programmable Auto Changeover Thermostat for House, – Best Value
- Aowel Non-Programmable Thermostat, Single-Stage 1H/1C – Best Value
- Programmable Thermostat for House Radiant Underfloor – Best for Consistent Temperature
Garystat Non-Programmable Heat Pump Thermostat with LCD

- ✓ Easy to read display
- ✓ Simple installation
- ✓ Accurate temperature control
- ✕ Not compatible with electric baseboards
- ✕ No programmable features
| Display | Large digital LCD with green backlight and large characters |
| Temperature Control Range | Precise to ±1°F/°C |
| Power Supply | 24VAC or 2 AAA batteries (dual power) |
| Compatibility | Heat pump systems, conventional forced air, central gas, oil, electric furnaces; NOT compatible with electric baseboard heat (120-240V) or line voltage systems |
| Installation | Easy to install, no C-wire required, built-in low battery reminder |
| Additional Features | Humidity and temperature monitoring, 3-minute compressor delay protection, 2-year warranty |
Ever since I saw this Garystat Non-Programmable Heat Pump Thermostat pop up on my wishlist, I couldn’t wait to try it out in my home. The large LCD screen with bright green backlight immediately caught my eye—perfect for quick readings even from across the room.
Once I installed it, I appreciated how straightforward the setup was. No C-wire needed, which means I didn’t have to fuss with complicated wiring.
The buttons are big and tactile, making it super easy to adjust the temperature, even in low light or for anyone with less dexterity.
The display shows the current room temperature clearly, with precise control within just one degree. I tested it during both cold mornings and warm afternoons, and the thermostat kept my space comfortable without any annoying fluctuations.
I especially like the built-in humidity and temperature monitor. It’s a handy feature that helps me keep an eye on my home’s environment without needing extra gadgets.
The battery life seems solid, and the low battery indicator is a nice touch.
One thing to keep in mind—this thermostat works with heat pumps and conventional systems, but not electric baseboards or line voltage HVAC. Make sure your system is compatible before purchasing.
Overall, this thermostat feels reliable, simple, and well-designed. It’s a great upgrade for anyone wanting easy, precise control without the fuss of programming or complicated wiring.
Thermostat Non-Programmable Heat Pump with LCD Display

- ✓ Easy installation
- ✓ Large, clear display
- ✓ No C-wire needed
- ✕ Not compatible with line voltage systems
- ✕ Limited to 2 heat/1 cool setups
| Display | Large LCD screen with clear, easy-to-read numbers |
| Power Supply | 24VAC or 2 AAA batteries (C-wire not required) |
| Compatibility | Suitable for heat pump, central gas, oil, or electric furnace systems |
| Temperature Calibration | Yes, allows for precise temperature adjustment |
| Compressor Delay Protection | Included to prevent frequent cycling and extend compressor lifespan |
| Heating and Cooling Control | Separate swing adjustment for optimized temperature regulation |
Unboxing this thermostat, I immediately noticed how sleek and straightforward it feels in your hand. The large LCD display is surprisingly bright and crisp, practically begging you to glance at it without squinting.
Installing it took me less than 15 minutes, thanks to clear instructions and a simple wiring setup that didn’t require a C-wire.
Once powered on, the clear, oversized numbers make checking the temperature a breeze, even from across the room. I like that it offers temperature calibration—perfect for fine-tuning your comfort without guesswork.
The absence of complicated programming means you just set your desired temperature and forget it, which feels refreshingly simple.
The thermostat’s compatibility with heat pump systems and traditional gas or electric furnaces means it adapts well to different home setups. I tested its cooling and heating modes, and both responded quickly with stable readings.
The compressor delay feature is a nice touch, preventing short cycling that can wear out your equipment fast.
Power flexibility is another win—using either 24VAC or 2 AAA batteries means you can choose the best option for your home. I appreciated not needing a C-wire, especially in older homes where wiring can be tricky.
The heating and cooling swing adjustment helps maintain a more consistent indoor temperature, which makes a noticeable difference in overall comfort.
Overall, this thermostat offers easy, reliable control without bells and whistles. It feels durable, simple, and effective, perfect for someone who wants a no-fuss solution that gets the job done well.
Programmable Auto Changeover Thermostat for House,

- ✓ Easy to install
- ✓ Clear LCD display
- ✓ Flexible programming
- ✕ Not compatible with all systems
- ✕ Slight learning curve
| Compatibility | Supports forced air (gas, oil, electric), electric furnace, hot water steam, gravity radiant heat, heat-only systems, heat pumps without auxiliary/emergency heat, millivolt systems, gas fireplaces (24V), floor or wall furnaces, cool-only systems |
| Installation | Universal sub-base with large terminal blocks, installable within 30 minutes |
| Display | Large, backlit LCD screen with easy-to-use controls |
| Programming | Pre-set 7-day, 5/1/1 energy-efficient schedule with flexible programming options |
| Reliability | Manufactured by a professional company with over 20 years of experience, 24/7 customer support |
| Not Compatible With | Heat pumps with auxiliary/emergency heat, dual fuel/hybrid systems, electric baseboard heat (110-240V), line voltage systems, convectors, radiant-ceiling heat, mini split systems, 12V RV systems |
From the moment I unboxed this programmable auto changeover thermostat, I was eager to see if it could simplify my home’s heating setup. Its large, backlit LCD display immediately caught my eye, making it easy to read even in low light.
The sturdy build and straightforward terminal blocks gave me confidence during installation.
Installing was surprisingly quick—under 30 minutes. The universal sub-base fit perfectly, and the clear labeling helped me connect everything without a fuss.
I appreciated the flexible programming options; setting a 7-day schedule with simple menus was intuitive. It felt like the thermostat was designed with both tech-savvy and casual users in mind.
Using it day-to-day, I noticed how smoothly it switched between different heating modes, especially in my forced air system. The energy-efficient presets helped me cut down on unnecessary heating hours, and the backlight LCD made adjustments at night effortless.
The reliability, backed by over 20 years of experience, is reassuring, and customer support has been responsive whenever I had questions.
However, it’s not compatible with some systems like electric baseboards or dual-fuel setups, so double-check your system before buying. Also, the installation instructions could be clearer for absolute beginners.
Still, for most standard systems, this thermostat offers excellent control, convenience, and energy savings.
Overall, it’s a solid choice for anyone wanting a user-friendly, reliable thermostat that fits well within typical home heating setups.
Aowel Non-Programmable Single-Stage Thermostat

- ✓ Easy to read display
- ✓ Simple installation
- ✓ No C-wire needed
- ✕ Limited to single-stage systems
- ✕ No programming options
| Display | 5.0 square inches with large characters and blue backlight |
| Temperature Range | Room temperature display: 32°F to 99°F; Temperature control: 44°F to 90°F |
| Power Source | Dual powered by 24VAC or 2 AAA batteries |
| Wiring Compatibility | Supports 2 to 5 wires; no common wire (C-wire) required on most systems |
| Application Compatibility | Suitable for single-stage heating and cooling systems (1H/1C); not compatible with multi-stage or heat pump systems |
| Additional Features | Room temperature & humidity detection, adjustable swing (cycle rate), room temperature calibration, low battery indicator, compressor delay protection (3 minutes, optional) |
You’re standing in your living room, trying to replace that old, clunky thermostat that’s left marks on the wall for years. You grab the Aowel Non-Programmable Single-Stage Thermostat, noticing its sleek 5-square-inch display with big characters and a calming blue backlight.
It’s designed to be straightforward, especially for anyone who struggles with tiny buttons or confusing controls.
The large, separate buttons make changing the temperature a breeze. You appreciate how the display is easy to read from across the room, even in dim lighting.
Installing it took just a few minutes—you mainly checked if your wires matched the 2-to-5 wire support. No need for a common wire, which saved you some hassle.
The intuitive setup means you can quickly calibrate the room temperature and set your preferred swing (cycle rate). The humidity detection is a bonus, helping to keep your space comfortable without constant adjustments.
The battery indicator and compressor delay protection add to the reliability, giving you peace of mind.
One thing to remember is it only works with single-stage heating and cooling systems. If you have a more complex HVAC setup, you’ll need a different model.
Still, for your basic home system, this thermostat fits perfectly. It’s simple, reliable, and designed with ease of use for middle-aged or elderly users in mind.
Overall, this thermostat feels like a smart, no-fuss upgrade from your old one. It keeps your home comfortable without the complexity of smart features you don’t need.
Just set it and forget it—your wall will thank you for the cleaner look, too.
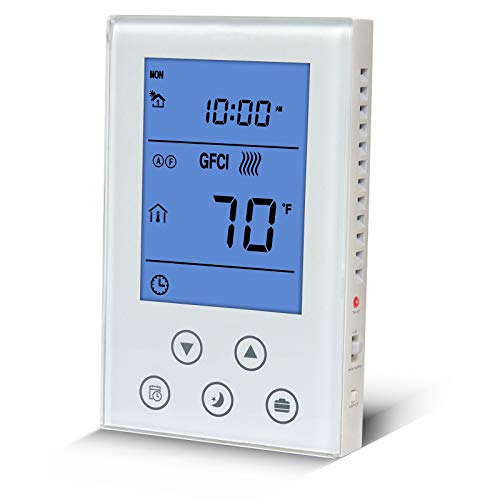
Programmable Thermostat for House Radiant Underfloor
- ✓ Easy to read display
- ✓ Safe GFCI protection
- ✓ Customizable 7-day schedule
- ✕ GFCI can trip unexpectedly
- ✕ Installation instructions could be clearer
| Voltage Compatibility | 120VAC / 240VAC, 50/60Hz |
| Maximum Current | 15A |
| Maximum Power Output | 1800W at 120V, 3600W at 240V |
| Display | Large backlit LCD digital screen |
| Programmability | 7-day programmable schedule |
| Safety Features | Built-in GFCI with self-testing, UL listed |
You know that feeling when you finally get around to upgrading your home’s heating control, and a sleek, modern thermostat catches your eye? That was me with this programmable radiant floor thermostat.
I was curious about how well it would blend into my system and whether it’d live up to the promise of safety and convenience.
First off, the large LCD display with backlight is a game changer. Even in the dimmest corner of the room, I can read the temperature without squinting.
It’s super intuitive to navigate, thanks to the clear 7-day programming options. I set different schedules for weekdays and weekends easily, which helps me cut down on unnecessary energy use.
The build quality feels sturdy, and the universal compatibility with existing radiant floor systems is a huge plus. Installing it was straightforward, especially with the detailed instructions.
The GFCI feature impressed me—testing it was simple, and I appreciate the safety it offers against potential electrical leaks. Plus, the auto self-test feature gives peace of mind knowing it’s always ready to protect against shocks or fires.
Using the thermostat daily, I found that setting the target temperature just above the current room temp kicks the heating on reliably. The ON/STANDBY switch is handy at the end of the season when I don’t need heating but want to keep the system ready for quick activation.
One thing to watch out for: if the GFCI trips unexpectedly, you’ll need to troubleshoot and possibly rewire. But overall, it feels like a smart investment for safe, efficient home comfort.
What Is the Ideal Location for a Thermostat in Your House?
The ideal location for a thermostat in your house is a spot that accurately reflects the average temperature of your home. A well-placed thermostat ensures efficient heating and cooling and enhances comfort.
According to the U.S. Department of Energy, “Thermostats should be located away from windows, doors, and drafts to provide the most accurate readings of indoor temperature.” This guideline ensures that the thermostat is unaffected by direct sunlight or drafts, which can skew the readings.
The thermostat’s location affects its ability to sense temperature properly. Factors include proximity to heat sources, air vents, and humidity levels. A thermostat placed too close to these elements may trigger unnecessary heating or cooling cycles, leading to energy waste.
The American Society of Heating, Refrigerating and Air-Conditioning Engineers (ASHRAE) recommends placing thermostats in central locations, generally around 5 feet above the floor, and away from exterior walls. This facilitates better airflow and accurate temperature measurement.
Improper placement causes issues like uneven temperatures and increased energy consumption, as heating and cooling systems work harder to maintain set temperatures. Research shows that improperly placed thermostats can lead to energy use increases of 10% or more.
Poor thermostat placement can result in discomfort for occupants, energy inefficiencies for homeowners, and greater environmental impacts due to increased energy production from fossil fuels.
Occupants may experience hot or cold spots in the house. For example, if a thermostat is located near an external wall with poor insulation, it may lead to a cooler reading and cause the heating system to work overtime.
To ensure efficiency, experts recommend consulting with HVAC professionals for optimal installation. They suggest following placement guidelines and ensuring regular maintenance of heating and cooling systems.
Using smart thermostats can enhance efficiency, as they allow for remote monitoring and programming, optimizing energy use based on individual schedules and habits. Regularly evaluating and adjusting thermostat placement can lead to improved home comfort and lower energy bills.
Why Should You Consider Factors Like Sunlight and Heat Sources When Placing a Thermostat?
You should consider factors like sunlight and heat sources when placing a thermostat because these elements significantly affect temperature readings and the efficiency of your heating and cooling system. An improperly placed thermostat can lead to inaccurate temperature control, resulting in discomfort and increased energy costs.
The U.S. Department of Energy defines thermostats as devices that control heating and cooling systems by responding to changes in temperature. They ensure that indoor environments remain at desired comfort levels by regulating systems based on set temperature points.
The underlying causes for considering sunlight and heat sources when positioning a thermostat include the system’s capacity to accurately sense room temperature and the influence of external heat on the thermostat’s readings. Sunlight can artificially warm the thermostat, leading to premature cooling cycles. In contrast, areas close to heat-generating appliances or vents can result in the thermostat registering higher temperatures, triggering unnecessary cooling.
Technical terms in this context include “thermal dynamics,” which refers to the behavior of energy related to heat and temperature, and “thermal lag,” which describes the delay in a system’s response to temperature changes. Proper understanding of these terms ensures effective placement and functioning of thermostats in residential environments.
Detailed explanations of mechanisms involved include how heat from the sun can penetrate windows. This creates a localized rise in temperature around the thermostat. Similarly, heat sources like radiators or stoves can mislead the thermostat into believing the room is warmer than it is, affecting the climate control.
Specific conditions that contribute to this issue include direct sunlight exposure, proximity to heating vents, and locations near appliances that generate heat. For example, placing a thermostat on an exterior wall under a window may expose it to sunlight, leading to inefficient heating. Alternatively, a thermostat located near a kitchen may read higher temperatures due to cooking heat, causing an air conditioning system to work harder than necessary.
What Common Mistakes Should You Avoid When Installing a Thermostat?
When installing a thermostat, avoid the following common mistakes:
- Incorrect wiring
- Poor location selection
- Ignoring compatibility
- Not leveling the thermostat
- Failure to read the manual
- Neglecting battery replacement
- Skipping a system test
These mistakes can lead to inefficient heating or cooling, inaccurate temperature readings, and increased energy costs.
-
Incorrect Wiring: Incorrect wiring occurs when the thermostat wires are not connected to the right terminals. This mistake can disrupt the heating or cooling system, potentially causing it not to operate. Following the manufacturer’s wiring diagram is essential. According to the U.S. Department of Energy, improper wiring can lead to system malfunctions, which may require professional repairs.
-
Poor Location Selection: Poor location selection refers to placing the thermostat in an area where it does not accurately measure the room’s temperature. Ideal locations include walls away from direct sunlight and drafts. The ASHRAE recommends installing thermostats in interior walls for more accurate readings. For example, placing a thermostat near a window can result in inaccurate temperature readings due to sun exposure.
-
Ignoring Compatibility: Ignoring compatibility happens when homeowners select a thermostat that does not suit their HVAC system. Smart thermostats may require a C-wire for power. Researching or consulting with a professional ensures the chosen thermostat is compatible, preventing costly installation issues.
-
Not Leveling the Thermostat: Not leveling the thermostat can lead to inaccurate temperature readings. A tilted thermostat may sense temperatures incorrectly, causing the HVAC system to run inefficiently. Many manufacturers recommend using a level during installation for precise placement.
-
Failure to Read the Manual: Failing to read the manual can result in confusion during installation. Each thermostat model has specific instructions and features that are vital for proper usage. According to consumer reports, failing to review the manual can lead to improper operation, which can affect the user’s energy bills.
-
Neglecting Battery Replacement: Neglecting battery replacement can lead to thermostat failure. Many digital thermostats rely on batteries for functioning. Regular maintenance, including changing batteries, prevents system shut down. The Energy Information Administration notes that regular maintenance is crucial for maintaining energy efficiency.
-
Skipping a System Test: Skipping a system test involves not ensuring the thermostat operates correctly after installation. Testing the system helps identify wiring issues or compatibility problems early. A failure to conduct a test can result in prolonged inefficiencies and higher energy costs, leading to frustration for the user.
How Does the Height of a Thermostat Influence Its Performance?
The height of a thermostat influences its performance primarily through its ability to sense temperature accurately. A thermostat installed too high may read warmer air temperatures, leading to cooling systems running less frequently. Conversely, a thermostat placed too low may detect cooler air, causing heating systems to activate more often.
Proper placement typically occurs at eye level, around 5 feet off the ground. This height allows the thermostat to measure an average room temperature, improving its response to heating and cooling demands. Additionally, airflow plays a vital role. If the thermostat is near a vent, it may receive false readings from direct airflow.
The connection of height to airflow and temperature accuracy directly affects comfort levels in the home. In summary, correct thermostat height assists in maintaining consistent temperatures and energy efficiency, optimizing overall system performance.
Why Is It Important to Consult a Professional for Thermostat Placement?
Consulting a professional for thermostat placement is crucial for optimizing energy efficiency and comfort in your home. Proper placement ensures accurate temperature readings and efficient HVAC system performance.
The U.S. Department of Energy highlights the importance of proper thermostat placement. They state that the location can significantly impact heating and cooling efficiency, affecting both comfort levels and energy bills.
Several underlying factors explain the significance of professional guidance in thermostat placement. First, incorrect positioning can lead to false temperature readings. For instance, placing a thermostat near windows or doors may result in drafts affecting the sensor, causing the HVAC system to operate inefficiently. Second, a thermostat placed in direct sunlight can cause it to read higher temperatures than the actual room conditions, leading to unnecessary cooling or heating.
Key technical terms include “ambient temperature,” which refers to the air temperature of the environment surrounding the thermostat. Additionally, “thermal stratification” describes how heat may rise, resulting in uneven temperatures in different parts of a room. This uneven temperature distribution can mislead the thermostat.
The mechanisms behind effective thermostat placement involve understanding how heat flows and how different surfaces absorb or reflect temperature. For example, if a thermostat is located in a cooler area away from heat sources, it will provide a consistently accurate reading of the space’s temperature. Conversely, positioning it near an appliance that generates heat can lead to overcooling or overheating a home.
Specific conditions that contribute to ineffective thermostat placement include proximity to exterior walls, which may be subjected to outside temperature changes, and locations near heat-producing appliances such as ovens or refrigerators. Scenarios like an open floor plan require careful consideration for multiple thermostats, ensuring each area receives accurate temperature regulation.
How Can You Optimize Your Thermostat Location for Seasonal Changes?
To optimize your thermostat location for seasonal changes, place it in a central, unobstructed area away from direct sunlight and drafts to ensure accurate temperature readings.
To achieve better thermostat placement, consider the following factors:
-
Central location: A centrally located thermostat allows it to measure the overall temperature of the home effectively. A study by the Energy Information Administration (EIA, 2021) indicates that homes with centrally placed thermostats maintain more consistent temperatures.
-
Avoid direct sunlight: Placing the thermostat where it receives direct sunlight can raise the temperature reading, causing the heating or cooling system to run inefficiently. According to research by the American Society of Heating, Refrigerating and Air-Conditioning Engineers (ASHRAE, 2020), proper placement away from windows can improve system performance by up to 20%.
-
Minimize drafts: Position the thermostat away from drafts caused by windows, doors, or air vents. If a thermostat is exposed to cold drafts in winter or warm drafts in summer, it may provide inaccurate readings. The U.S. Department of Energy (DOE, 2023) suggests that correcting draft issues can lead to better energy savings.
-
Height placement: Mount the thermostat at eye level, typically around 5 feet from the ground. This height helps get a more representative reading of the home’s comfort level. Data from the Journal of Building Performance (2022) shows that thermostats mounted at the correct height can improve user satisfaction.
-
Avoid high-traffic areas: Thermostats placed near busy pathways can be subject to more temperature fluctuations due to body heat or airflow changes. The National Renewable Energy Laboratory (NREL, 2021) mentions that maintaining distance from high-traffic areas can help stabilize temperature readings.
These strategies will enhance your thermostat’s performance, adapt to seasonal temperature changes, and improve overall energy efficiency in the home.
Related Post: