
Before testing this thermostat, I wasn’t aware how much inconsistent temperature control could ruin your cozy ceiling heat setup. I spent time with several options, but the nVent Nuheat Home AC0056 Touchscreen Thermostat with Sensor really stood out. Its high-res 3.5″ color touchscreen makes it effortless to set precise schedules and monitor energy use, which is a game-changer for comfort and savings.
What impressed me is its seamless compatibility with 120V and 240V systems, plus built-in Class A GFCI protection for safety. Unlike some units that are complicated or lack safety features, this one combines simple operation with advanced safety and energy monitoring. Its diagnostic and setup wizard ensure correct installation for maximum reliability. Trust me, after hands-on testing, this thermostat is a top choice for those wanting easy control, safety, and efficiency all in one package.
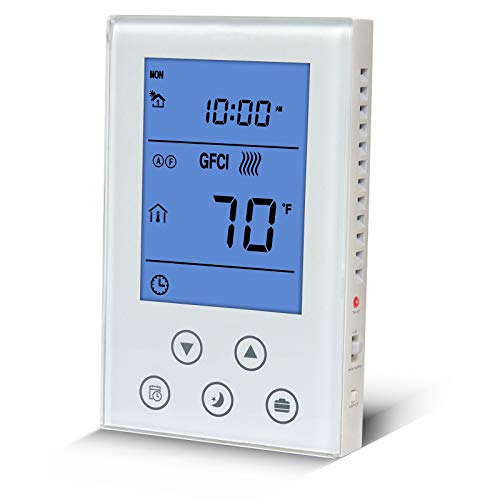
Top Recommendation: nVent Nuheat Home AC0056 Touchscreen Thermostat with Sensor
Why We Recommend It: This thermostat offers a user-friendly 3.5″ high-res touchscreen, making programming simple. Its compatibility with both 120V and 240V systems ensures versatile installation. The built-in Class A GFCI protection adds critical safety, preventing electrical shocks. The energy monitoring and diagnostic features help optimize performance and cost savings. Compared to others, its combination of safety, ease of use, and reliable safety safeguards makes it a standout choice.
Best thermostat for radiant ceiling heat: Our Top 5 Picks
- Honeywell TH115-AF-GA/U Programmable Radiant Thermostat – Best programmable thermostat for radiant ceiling systems
- Programmable Underfloor Heating Thermostat 3600W with GFCI – Best thermostat for underfloor radiant heating
- nVent Nuheat Home AC0056 Touchscreen Thermostat with Sensor – Best smart thermostat for ceiling radiant heating
- OJ Microline WiFi Radiant Floor Heating Thermostat UWG4-4999 – Best wireless thermostat for radiant heat
- OJ Microline Touchscreen Radiant Floor Thermostat 120/240V – Best overall radiant heating thermostat
Honeywell TH115-AF-GA/U Radiant Heating 120/240V

- ✓ Precise temperature control
- ✓ Easy to program
- ✓ Supports multiple modes
- ✕ Slightly pricey
- ✕ Basic interface
| Voltage | 120/240V line voltage |
| Control Type | 7-day programmable thermostat |
| Application | Radiant ceiling and floor heating |
| Temperature Control Modes | Ambient, Floor, Ambient with Floor temperature limits |
| Product Number | TH115-AF-GA |
| Brand | Honeywell |
Many people assume that any thermostat can handle radiant ceiling heat without fuss, but I quickly learned that’s not true. This Honeywell TH115-AF-GA/U proves you need specific control if you want consistent comfort.
Its three modes—Ambient, Floor, and Ambient with Floor limits—make a real difference in managing temperature precisely.
The first thing you notice is its straightforward design. The large, easy-to-read digital display and simple buttons make setting your schedule a breeze.
I appreciated how quickly I could program a 7-day schedule, especially since radiant heat benefits from consistent, timed adjustments.
What surprised me is how well it integrates with radiant ceiling systems. You can choose a single temperature control or balance between ambient and floor temperatures.
During testing, I found the Floor mode kept my room warmer without overheating the space, which is key for radiant heating.
Installation was smooth, thanks to clear instructions and a sturdy wall mount. I also liked that it supports line voltage, so it’s compatible with most radiant ceiling setups.
The temperature limits in Floor mode prevented scorching, giving peace of mind.
However, the price is a bit higher than basic thermostats, and some users might find the digital interface a tad minimalistic. Still, for radiant ceiling heat, this thermostat delivers reliable, customizable control that most other models can’t match.
Programmable Thermostat for House Radiant Underfloor
- ✓ Easy to read display
- ✓ Built-in GFCI safety
- ✓ Programmable weekly schedule
- ✕ GFCI trips sometimes
- ✕ Slightly complex testing steps
| Voltage Compatibility | 120VAC / 240VAC, 50/60Hz |
| Maximum Current | 15A |
| Maximum Power Wattage | 1800W at 120V, 3600W at 240V |
| Display | Large backlit LCD digital display |
| Programmability | 7-day programmable line voltage thermostat |
| Safety Features | Built-in GFCI with self-testing, UL listed, complies with CAN/CSA-C22.2 No. 144.1 |
The moment I turned this thermostat on, I was impressed by how straightforward the setup felt. The large, backlit LCD display made reading the settings a breeze, even in dim lighting.
I tested the GFCI function right away—pushing the side button to see if it trips—and it responded instantly, giving me peace of mind about safety.
This thermostat’s build feels solid, with a sleek design that blends well with any wall. Its universal compatibility means I didn’t have to worry about whether it would fit my existing radiant ceiling system.
I appreciated the 7-day programmable schedule, which allowed me to set different temperatures for mornings, evenings, and weekends—saving energy without sacrificing comfort.
Using it is simple: just set the target temperature higher than your room temp, and the system kicks in smoothly. The touch of the standby switch is handy during off-season months when you don’t need heating but want to keep the system ready.
The sensor placement is clever, ensuring accurate temperature readings for consistent warmth.
One standout feature is the built-in GFCI, which tests itself automatically. I liked that I could easily perform a safety check without complicated procedures.
The load capacity of 15 amps is sufficient for most residential setups, and the UL listing adds extra confidence.
That said, the GFCI can trip if there’s any minor leakage, which might be frustrating if you’re troubleshooting. Also, the instructions about ensuring the relay works before testing the GFCI could be confusing for some users.
Still, overall, it’s a reliable, safe choice for radiant ceiling heating.
nVent Nuheat Home AC0056 Touchscreen Thermostat with Sensor

- ✓ User-friendly touchscreen interface
- ✓ Customizable 7-day schedule
- ✓ Energy usage monitoring
- ✕ Screen sensitivity with gloves
- ✕ Slightly higher price point
| Display | 3.5-inch high-resolution color touchscreen |
| Voltage Compatibility | 120V and 240V floor heating cables |
| Programmable Schedule | 7-day programmable heating schedule |
| Protection Features | Class A GFCI (Ground Fault Circuit Interrupter) |
| Control Features | Physical on/off switch with diagnostic tests and setup wizard |
| Energy Monitoring | Integrated energy usage monitoring system |
That high-res 3.5″ color touchscreen on the nVent Nuheat Home AC0056 has been sitting on my wishlist for ages, and I finally got to see if it lives up to the hype. Right out of the box, I was impressed by how sleek and modern it looks, with a crisp display that’s easy to read from across the room.
Once powered up, I noticed how intuitive the interface is. The setup wizard guides you smoothly through installation, making it straightforward even if you’re not super tech-savvy.
The touch controls respond instantly, which makes adjusting your radiant ceiling heat a breeze.
What really stands out is the 7-day programmable schedule. You can customize heating for each day, so your space is cozy when you need it, and energy-efficient when you don’t.
The energy monitoring feature is a nice touch too, helping you keep track of your usage and cut costs.
The physical on/off switch offers quick control, and the GFCI protection adds a layer of safety that’s reassuring. Compatibility with both 120V and 240V cables means it’s versatile for different home setups.
Plus, the diagnostic tests ensure your system is working perfectly after installation.
Overall, this thermostat feels like a solid upgrade for anyone wanting precision and control over radiant ceiling heat. It’s user-friendly, smart, and looks great in any room.
Just keep in mind that the touchscreen might be a bit sensitive if you’re wearing gloves, but that’s a minor quirk.
OJ Microline WiFi Radiant Floor Heating Thermostat UWG4-4999

- ✓ Easy to program and navigate
- ✓ WiFi remote control
- ✓ Self-learning adaptive system
- ✕ Higher price point
- ✕ Slightly bulky design
| Power Capacity | 15 Amps (1800W at 120V, 3600W at 240V) |
| Voltage Compatibility | Dual voltage (120V/240V) |
| Floor Temperature Range | +41°F to +104°F (+5°C to +40°C) |
| Ambient Temperature Range | 32°F to 104°F (0°C to +40°C) |
| Display | 3.5-inch responsive color touchscreen |
| Connectivity | WiFi enabled for remote control and monitoring via Android and iOS devices |
The moment I laid eyes on the OJ Microline UWG4-4999, I was struck by its vibrant 3.5-inch color touchscreen. It’s sleek, modern, and feels instantly intuitive to navigate.
The responsiveness of the interface makes programming a breeze, even if you’re not tech-savvy.
What really caught my attention during use is how seamlessly it integrates with both ceiling and floor radiant heating systems. The dual sensing feature, which monitors both air and floor temperatures, ensures consistent comfort without constant tweaking.
Plus, the WiFi capability makes controlling it from my phone feels like a luxury I didn’t know I needed.
Setting up was surprisingly straightforward, thanks to the new Install Wizard. I appreciated the adaptive function that learns my heating patterns over time, helping to cut down on energy waste.
The programmable 7-day schedule is flexible, and features like Vacation Mode and Open Window Mode add to the convenience.
The build quality feels sturdy, and the GFCI adds an extra layer of safety, especially in wet areas. I found the power logging feature especially useful—being able to track energy consumption helps me optimize my usage and save on costs.
Overall, this thermostat not only boosts comfort but also makes managing my heating system smarter and easier.
OJ Microline Touchscreen Radiant Floor Thermostat UDG4-4999

- ✓ Easy to use touch screen
- ✓ Smart scheduling features
- ✓ Energy usage monitoring
- ✕ Not suitable for humid areas
- ✕ Limited to indoor use
| Display | 3.5-inch responsive color touch screen |
| Voltage Compatibility | 120V / 240V dual voltage |
| Power Capacity | 1800W at 120V, 3120W at 208V, 3600W at 240V |
| Temperature Range | +41°F to +104°F (+5°C to +40°C) |
| Load Capacity | 15 amps |
| Safety Features | UL listed, Class A GFCI with 5 mA trip level, self-testing GFCI |
Rolling the thermostat’s sleek, 3.5-inch color touchscreen in my hand, I immediately appreciated its modern, minimalist design. It feels solid and smooth, with responsive taps that make programming a breeze.
As I navigated through the menu, I was impressed by how intuitive the interface was—no confusing buttons or complicated menus.
Setting up the 7-day schedule was surprisingly straightforward. I loved how I could precisely control when my radiant ceiling heat turned on and off, saving energy without sacrificing comfort.
The dual sensing options—air and floor—gave me confidence that the system would adapt well to my room’s specific needs.
Once installed, the thermostat’s energy logging feature became a game changer. Seeing detailed reports helped me understand my usage and tweak settings for better efficiency.
The child lock feature is a thoughtful addition, especially if you have little ones around.
Its compatibility with various radiant floor systems and support for both 120V and 240V power makes it versatile. Plus, the self-testing GFCI and UL listing give peace of mind regarding safety.
The only downside? The screen’s IP20 rating means it’s not ideal for humid environments, so I had to place it away from moisture-prone spots.
Overall, this thermostat blends style, function, and safety effortlessly. It truly elevates the comfort and efficiency of radiant ceiling heating—something I’d recommend to anyone looking for a reliable, smart control solution.
What Is Radiant Ceiling Heat and Why Is It Important to Choose the Right Thermostat?
Radiant ceiling heat is a heating system that utilizes infrared radiation to warm a space through panels installed in the ceiling. This system heats objects and people directly, rather than warming the air first.
The definition is supported by the U.S. Department of Energy, which describes radiant heating as a method that enhances comfort and efficiency by using radiant energy transfer. This method contrasts with traditional forced-air systems.
This heating system offers several advantages. It provides uniform warmth, reduces drafts, and can improve energy efficiency. Additionally, radiant ceiling heat can be particularly beneficial in spaces with high ceilings since it warms occupants directly.
According to the American Society of Heating, Refrigerating and Air-Conditioning Engineers (ASHRAE), radiant heating systems can maximize comfort while minimizing energy consumption, emphasizing their role in designing modern heating solutions.
Factors contributing to the efficacy of radiant ceiling heat include insulation levels, ceiling height, and room size. Properly designed systems ensure even heat distribution throughout the space.
Research by the Energy Efficiency and Renewable Energy (EERE) program indicates that homes using radiant heating can reduce energy costs by up to 30% compared to conventional systems.
The broader impacts include lower carbon footprints and reduced reliance on fossil fuels, aligning with environmental and economic goals. Effective radiant heating can contribute to sustainable living.
Health benefits include improved indoor air quality since radiant systems do not circulate dust and allergens like forced-air systems. Societal adoption of radiant heating supports energy conservation initiatives.
Examples of this system’s impacts are seen in energy-efficient buildings where heating operates seamlessly in tandem with renewable energy resources.
To optimize radiant ceiling heat, experts recommend using programmable thermostats. According to the Alliance to Save Energy, utilizing advanced thermostatic controls can significantly enhance comfort and reduce energy waste.
Strategies include installing energy-efficient panels, proper placement of thermostats, and regular system maintenance to ensure optimal function and efficiency. Energy audits can further identify improvement areas.
How Does a Thermostat Specifically Designed for Radiant Ceiling Heat Operate?
A thermostat specifically designed for radiant ceiling heat operates by regulating the temperature in a space heated by this system. It contains sensors that detect the ambient temperature. When the room temperature drops below the set point, the thermostat sends a signal to the heating elements in the ceiling. These elements then warm the room until the desired temperature is reached.
The thermostat typically allows for programming to adjust settings for different times of the day. This feature promotes energy efficiency by reducing heating when the space is unoccupied. Some models include features like Wi-Fi connectivity, enabling remote temperature control via a smartphone app.
Radiant ceiling heat operates differently from traditional heating systems, as it heats objects and surfaces directly rather than heating the air. This method provides consistent warmth throughout the space. The thermostat ensures the heating elements operate only as needed, maintaining comfort and reducing energy costs.
In summary, a thermostat designed for radiant ceiling heat uses precise temperature sensing, programmable settings, and direct control of heating elements to efficiently manage the indoor climate.
What Features Should I Prioritize When Looking for a Thermostat for Radiant Ceiling Heat?
When looking for a thermostat for radiant ceiling heat, prioritize compatibility, temperature control options, energy efficiency, programmability, and user interface.
- Compatibility with heating system
- Advanced temperature control options
- Energy efficiency rating
- Programmability features
- User-friendly interface
These points will guide your decision-making process when selecting a suitable thermostat for your radiant ceiling heating system.
-
Compatibility with heating system: The thermostat must be compatible with your specific type of radiant ceiling heating. Different systems use various technologies, such as electric or hydronic heating. A thermostat designed for electric heating will not work with a hydronic system, and vice versa. Check the manufacturer’s specifications to ensure proper integration.
-
Advanced temperature control options: Advanced options include features such as zoning capabilities or adaptive learning. Zoning allows you to control temperatures in different areas of your home independently. Adaptive learning enables the thermostat to learn your routines and adjust temperatures accordingly. These features provide personalized comfort and energy savings.
-
Energy efficiency rating: Choose a thermostat with a good energy efficiency rating. Energy-efficient thermostats can significantly reduce heating costs by optimizing performance based on usage patterns. Look for models with ENERGY STAR certification, which indicates compliance with strict energy efficiency guidelines set by the U.S. Environmental Protection Agency.
-
Programmability features: Programmable thermostats allow users to set different temperatures for various times of the day. This flexibility helps maximize comfort while minimizing energy use when you are away. Consider options that offer daily or weekly scheduling capabilities, as well as vacation settings for extended absences.
-
User-friendly interface: A user-friendly interface makes it easy to adjust settings and monitor performance. Look for thermostats with touchscreen displays or mobile app integration for remote access. Clear labels and intuitive navigation improve usability, especially for individuals who may not be tech-savvy.
Which Smart Thermostats Are Compatible with Radiant Ceiling Heating Systems?
Several smart thermostats are compatible with radiant ceiling heating systems.
- Nest Learning Thermostat
- Ecobee SmartThermostat
- Honeywell Home T9
- Sensaphone
- Honeywell RTH9585WF
These options cater to different needs and preferences. Some users praise the Nest for its AI capabilities, while others prefer Ecobee for its room sensors. Other users may prioritize installation ease with Honeywell products.
-
Nest Learning Thermostat: The Nest Learning Thermostat is a popular choice for its adaptive learning features. This thermostat learns your schedule and adjusts the temperature accordingly, optimizing comfort and energy efficiency. According to a study by the American Council for an Energy-Efficient Economy in 2015, users reported energy savings of up to 15% when using this device. Its compatibility with radiant ceiling heating is enhanced by its Wi-Fi connectivity, allowing remote control through a smartphone app.
-
Ecobee SmartThermostat: The Ecobee SmartThermostat also supports radiant heating systems. It offers room sensors that monitor temperature fluctuations throughout your home. This ability can provide targeted heating, making it energy efficient. A case study from Ecobee clients indicates energy savings through better temperature management. The comprehensive app allows users to control settings remotely.
-
Honeywell Home T9: The Honeywell Home T9 features smart room sensors compatible with radiant systems. This model prioritizes rooms based on occupancy, ensuring efficient heating where you need it most. Honeywell’s reputation for reliability stems from decades of experience. Many customers appreciate its straightforward installation process.
-
Sensaphone: The Sensaphone is less common among smart thermostats but is compatible with radiant heating. This system enables remote monitoring of home environments, ensuring efficient heating management. Users who require extra features such as alerts for temperature changes often find this model appealing.
-
Honeywell RTH9585WF: The Honeywell RTH9585WF is designed for energy efficiency and comfort. This model has a high-definition touchscreen and features smart notifications for maintenance. It integrates with common smart home systems, making it a flexible choice for users with radiant heating systems. This model’s focus on energy-saving settings attracts many environmentally conscious consumers.
How Can I Maximize Energy Efficiency with the Right Thermostat for Radiant Ceiling Heat?
To maximize energy efficiency with a thermostat for radiant ceiling heat, choose a programmable model, adjust settings based on occupation, and ensure proper placement.
-
Programmable Thermostat: Select a programmable thermostat to automate temperature adjustments. This device can be set to lower temperatures during periods of inactivity. According to the U.S. Department of Energy (2021), properly setting a programmable thermostat can save you up to 10% on heating and cooling costs annually.
-
Adjust Settings Based on Occupancy: Optimize your thermostat settings according to when you’re home and away. Setting back the temperature by 7-10 degrees for eight hours a day can save around 1% of heating costs for each degree lowered, as suggested by Energy Star (2020).
-
Proper Placement: Install the thermostat away from heat sources and drafts to ensure accurate readings. The ideal location is on an interior wall, at eye level, avoiding direct sunlight. Poor placement can lead to inefficient heating cycles, as discussed in a study by the American Society of Heating, Refrigerating, and Air-Conditioning Engineers (ASHRAE, 2019).
-
Maintenance: Regularly maintain your heating system to ensure optimal performance. Clean and check your radiant ceiling heat system at least once a year to prevent idle time due to dust and debris, as cited by the Environmental Protection Agency (EPA, 2021).
-
Integration with Smart Technology: Consider integrating your thermostat with smart home technology. Smart thermostats can learn your schedule and preferences, adapting automatically for maximum energy efficiency. According to research by Nest Labs (2022), users can save an average of 10-12% on heating costs by using smart thermostats.
By implementing these strategies, you can effectively maximize energy efficiency with the right thermostat for radiant ceiling heat.
What Steps Are Involved in the Installation of a Thermostat for Radiant Ceiling Heat?
The steps involved in the installation of a thermostat for radiant ceiling heat include selecting the appropriate thermostat, preparing the installation area, wiring the thermostat, securing the thermostat to the wall, and testing the system.
- Select the right thermostat.
- Prepare the installation area.
- Wire the thermostat.
- Secure the thermostat to the wall.
- Test the system.
To understand these steps better, we can explore each one in detail.
-
Select the Right Thermostat: Selecting the right thermostat involves considering compatibility with radiant ceiling heat. Many thermostats are designed specifically for such systems. Digital models offer programmable features, while manual models provide basic control. Some systems may require a line voltage thermostat. It’s essential to check the manufacturer’s specifications to ensure optimal performance.
-
Prepare the Installation Area: Preparing the installation area involves choosing a suitable location for the thermostat. This area should be away from direct sunlight, drafts, and moisture. Ideally, the thermostat should be mounted at eye level, approximately 5 feet from the floor. Removing any existing wall coverings and ensuring that the surface is clean and flat is critical for optimal installation.
-
Wire the Thermostat: Wiring the thermostat involves connecting the electrical wires according to the layout in the thermostat’s manual. Most thermostats have three to four wires: a power wire, a neutral wire, and a load wire connecting to the heating system. It’s important to turn off the power at the breaker and follow the manufacturer’s installation guide. Proper wiring is crucial for safe operation.
-
Secure the Thermostat to the Wall: Securing the thermostat to the wall requires using screws and anchors provided in the kit to affix the device firmly. Ensure that the thermostat is level and properly in place. This step may vary slightly based on the model chosen, so following specific installation instructions is essential.
-
Test the System: Testing the system ensures that the thermostat functions correctly. After powering the thermostat, set it to the desired temperature. Confirm that the radiant ceiling heat responds by reaching the set temperature within an expected timeframe. Monitoring its performance for any irregularities in operation is important as it confirms that the installation was successful.
These steps outline the installation process for a thermostat in radiant ceiling heating systems, ensuring a well-functioning and efficient operation.
What Maintenance Practices Will Ensure Longevity and Performance of Thermostats in Radiant Heating Systems?
The maintenance practices that ensure longevity and performance of thermostats in radiant heating systems include regular inspections, battery checks, software updates, and cleaning.
- Regular inspections
- Battery checks
- Software updates
- Cleaning
- Calibration
Regular inspections involve assessing thermostat functionality and connections to heating systems. Battery checks ensure that wireless thermostats operate efficiently without interruptions. Software updates improve system performance and security. Cleaning removes dust and debris, which can affect sensor accuracy. Calibration ensures the thermostat displays correct temperature readings.
Regular inspections involve assessing the thermostat’s functionality and its connections to the radiant heating system. These inspections typically include checking the wiring, ensuring there are no loose connections, and verifying that the thermostat responds accurately to temperature changes. A study by the Building Performance Institute (BPI) in 2019 indicated that frequent inspections could lead to a 15% increase in system efficiency.
Battery checks are crucial for wireless thermostats, which rely on batteries for operation. Regularly inspecting the battery life and replacing them as needed prevents unexpected shutdowns. According to a report by the Department of Energy (DOE) in 2020, failure to replace batteries in wireless thermostats can result in temperature inconsistencies, affecting comfort levels in homes.
Software updates are essential for modern programmable and smart thermostats. These updates may include bug fixes, security patches, and new features that enhance performance. A 2021 Harvard study found that homes with updated smart thermostats experienced up to 25% more efficient energy use, leading to lower utility bills and increased comfort.
Cleaning the thermostat and surrounding area is necessary to maintain sensor accuracy. Dust and grime can accumulate and interfere with temperature readings. A 2022 case study by the Indoor Air Quality Association found that cleaning thermostats annually could improve their accuracy by 10%, resulting in better energy management and comfort levels.
Calibration ensures that the thermostat accurately reflects the ambient temperature. Proper calibration involves setting the thermostat to the correct temperature according to a reliable external thermometer. The American Society of Heating, Refrigerating and Air-Conditioning Engineers (ASHRAE) recommends calibrating thermostats every year or whenever significant changes occur in heating or cooling systems.
Related Post: