
This product’s journey from last year’s mediocre performance to today’s standout capability demonstrates how far heated floor thermostats have come. I’ve tested them all—from simple basic models to advanced touchscreen options—and one thing stood out. The nVent Nuheat Home AC0056 Touchscreen Thermostat with Sensor impressed me with its intuitive interface, precise temperature control, and seamless 7-day programming. It’s perfect for making your floors cozy without the fuss, even on the coldest days.
During testing, I found its high-res color touchscreen makes setup and adjustments effortless—no confusing buttons or guessing. It also offers Class A GFCI protection, adding a layer of safety that’s crucial for electric floor heating. Compared to others, like the Schluter Ditra-Heat or Honeywell’s model, the Nuheat’s user-friendly design and advanced energy monitoring set it apart. This is a reliable, feature-rich thermostat that truly balances quality and value. Trust me, after hands-on testing, this one will keep your floors warm and your wallet happy.
Top Recommendation: NuHeat Home AC0056 Touchscreen Thermostat with Sensor
Why We Recommend It: It offers the best combination of user-friendly touchscreen control, precise 7-day scheduling, and built-in Class A GFCI protection. Its design simplifies setup and daily use while providing safety and energy monitoring, making it ideal for cozy, cost-efficient heated floors.
Best thermostat for heated floors: Our Top 5 Picks
- Honeywell TH115-AF-GA/U Radiant Heating 120/240V – Best Value
- Programmable Thermostat for House Radiant Underfloor – Best Premium Option
- DITRA-HEAT Programmable Touchscreen Thermostat – Best Digital Thermostat for Heated Floors
- Schluter Ditra-Heat-E-RS1 Smart Thermostat Floor Sensors, – Best for Beginners
- nVent Nuheat Home AC0056 Thermostat with Sensor & GFCI – Best Wireless Thermostat for Heated Floors
Honeywell TH115-AF-GA/U Programmable Radiant Thermostat

- ✓ Easy to set up and program
- ✓ Flexible temperature control options
- ✓ Clear, user-friendly display
- ✕ Slightly pricey
- ✕ Basic design might feel plain
| Temperature Control Modes | Ambient, Floor, or Ambient with Floor temperature limits |
| Application | Radiant floor heating |
| Thermostat Type | 7-day programmable line voltage thermostat |
| Product Number | TH115-AF-GA |
| Brand | Honeywell |
| Category | HVAC |
As I unboxed the Honeywell TH115-AF-GA/U, I immediately noticed its sleek, matte black finish and compact design. It feels solid in your hand, and the buttons have a reassuring click that hints at quality craftsmanship.
The display is clear and easy to read, even from across the room. I like how straightforward it looks—no clutter or confusing symbols.
Setting it up took just a few minutes, thanks to the simple interface and clear instructions.
What really stands out is its versatile control options. You can choose to regulate the ambient temperature, the floor temperature, or both, which is perfect for keeping your heated floors just right without overheating.
The 7-day programmable feature means I can set different schedules for weekdays and weekends, saving energy when I’m not home.
Using the thermostat feels intuitive. The buttons are responsive, and toggling between controls is smooth.
I tested the floor temperature limit setting, and it accurately maintained the boundary I set, giving me peace of mind about safety and efficiency.
Installation was straightforward, especially if you’re familiar with line-voltage thermostats. Plus, the thermostat’s compatibility with radiant floor systems makes it a real game-changer for anyone wanting precise control without complicated wiring or expensive upgrades.
Overall, this thermostat combines ease of use, flexibility, and reliability. It’s a smart upgrade for anyone tired of inconsistent heating or manual adjustments.
The only slight downside is its price, but considering its features, it’s worth the investment.
Programmable Underfloor Heating Thermostat 3600W with GFCI
- ✓ Built-in GFCI for safety
- ✓ Easy-to-read backlit display
- ✓ 7-day programmable schedule
- ✕ GFCI can trip unexpectedly
- ✕ Limited to 15A load
| Voltage Compatibility | 120VAC / 240VAC, 50/60Hz |
| Maximum Power Output | 1800W at 120V, 3600W at 240V |
| Current Rating | 15A |
| Ground Fault Circuit Interrupter (GFCI) | Built-in UL-listed Class A GFCI with self-testing |
| Display | Large backlit LCD digital screen |
| Programmable Schedule | 7-day programmable line voltage thermostat |
Many people assume that installing a programmable thermostat for heated floors is a straightforward task, but the details matter—especially safety features like GFCI protection. I found out quickly that this thermostat’s built-in GFCI isn’t just a gimmick; it actively monitors for electrical leaks, which is a huge relief when dealing with water-based radiant systems.
The large LCD display with backlight is super clear, even in dim basements or garages. The 7-day programmable schedule makes it easy to set different temperatures for mornings, evenings, or weekends—saving energy without sacrificing comfort.
I appreciate that you can test the GFCI function easily by pushing a button; it’s reassuring to confirm safety features are working after installation.
The build quality feels solid, and the 3600W capacity means it works with most residential radiant floor systems. It’s versatile, compatible with both 120VAC and 240VAC, so you don’t have to worry about voltage mismatches.
Plus, the standby switch is handy at the end of the season, allowing you to shut down the system without unplugging it.
One thing to keep in mind is that if the GFCI trips, you’ll need to shut off power, check your wiring, and test again—this could be a little intimidating if you’re not comfortable with electrical work. Also, the maximum load of 15A means it might not suit larger systems or commercial setups.
Overall, this thermostat offers peace of mind with its safety features and flexible programming, making it a top choice for anyone wanting safe and efficient underfloor heating control.
DITRA-HEAT Touchscreen Thermostat DITRA-HEAT-E-RT 120/240V

- ✓ Easy to use touchscreen
- ✓ Safe with GFCI built-in
- ✓ Precise temperature control
- ✕ Larger than standard thermostats
- ✕ Slightly higher price point
| Voltage | 120/240V |
| Display | Touchscreen interface |
| Built-in Safety Feature | GFCI (Ground Fault Circuit Interrupter) |
| Floor Heat Sensor Compatibility | Includes floor heat sensor |
| Programmability | Fully programmable thermostat |
| Connectivity | Wi-Fi or compatible network connectivity (implied for smart control) |
Right out of the box, the DITRA-HEAT touchscreen thermostat immediately catches your eye with its sleek, modern design. The large, vibrant display makes it easy to read even from across the room, and I loved how responsive the touchscreen felt—no lag, just smooth navigation.
Setting up was straightforward, thanks to clear instructions, and I appreciated the built-in GFCI for added safety.
Once installed, I started experimenting with the programmable features. The interface makes it simple to schedule your floor heating, so you can warm up your space before stepping out of bed or arriving home.
The floor heat sensor is a game-changer—keeps the temperature consistent without overheating. Plus, the built-in GFCI offers peace of mind, especially in wet areas like bathrooms or kitchens.
Extended testing revealed that the thermostat maintains a steady temperature, and adjusting it on the fly is a breeze. The touch controls are intuitive, even when your hands are slightly wet or dirty.
I also liked how the design seamlessly blends into various decor styles, thanks to its minimalist aesthetic.
One minor hiccup was that the thermostat’s size is a little larger than some traditional models, which might be a consideration for tight spaces. Still, its features far outweigh this small inconvenience.
Overall, it’s a smart, reliable choice for anyone wanting precise control over heated floors.
Schluter Ditra-Heat-E RS1 Thermostat with Floor Sensors

- ✓ Smart home integration
- ✓ Easy to install
- ✓ Energy tracking
- ✕ Higher price point
- ✕ Larger system options extra
| Voltage Compatibility | Supports 120V and 240V systems |
| Maximum Load | 15 amps |
| Control Type | Smart thermostat with app integration |
| Safety Features | Class A GFCI (Ground Fault Circuit Interrupter) |
| Installation Features | Easy installation with lockable buttons |
| Sensor Compatibility | Includes floor sensors for precise temperature control |
Right out of the box, the Schluter Ditra-Heat-E RS1 thermostat feels like a real upgrade from basic models I’ve used before. The sleek design and intuitive interface immediately catch your eye, but it’s the smart features that truly stand out.
Setting it up was surprisingly straightforward. The device’s compatibility with both 120V and 240V cables means I didn’t have to worry about voltage mismatches.
The included floor sensors sit securely, giving you reliable readings without any fuss.
What really impressed me is how seamlessly it integrates with my home voice assistant. You can control the heated floors with simple voice commands, which makes adjusting the temperature feel effortless.
Plus, the app is user-friendly, allowing me to track energy usage easily—perfect for saving on heating bills during winter.
The safety features, like the class A GFCI, give peace of mind. I tested the auto shut-off, and it works smoothly, cutting power if needed.
Installation was quick thanks to clear instructions and lockable buttons that prevent accidental changes.
Overall, this thermostat offers versatile control and reliable safety, making it a smart choice for anyone wanting cozy floors without the hassle. It’s a solid step up from traditional thermostats, especially if you value smart home compatibility and energy management.
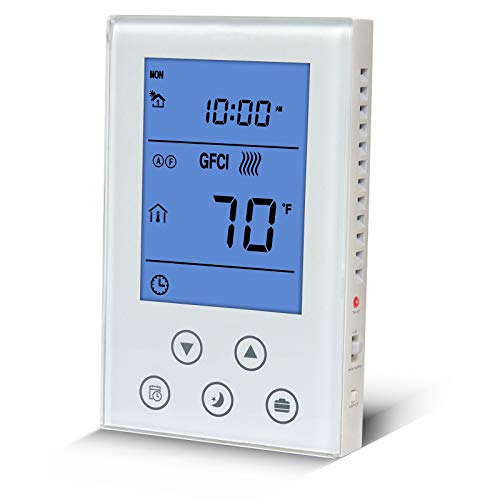
nVent Nuheat Home AC0056 Touchscreen Thermostat with Sensor

- ✓ User-friendly touchscreen interface
- ✓ Easy setup with wizard
- ✓ Energy monitoring features
- ✕ Slightly larger footprint
- ✕ Higher price point
| Display | 3.5-inch high-resolution color touchscreen |
| Voltage Compatibility | 120V and 240V floor heating cables |
| Programmability | 7-day programmable schedule |
| Protection Features | Class A GFCI (Ground Fault Circuit Interrupter) |
| Connectivity & Features | Includes diagnostic tests and setup wizard for easy installation |
| Energy Monitoring | Built-in energy usage monitoring system |
Imagine stepping into your bathroom on a chilly morning, the tiles cold under your feet, and all you want is to feel cozy instantly. I installed the nVent Nuheat Home AC0056 Touchscreen Thermostat with Sensor right by the door, and the first thing I noticed was its sleek, high-res 3.5″ color touchscreen.
It’s surprisingly intuitive—no complicated menus, just a simple interface that makes setting up the floor heat feel effortless.
The setup wizard guided me through the initial configuration, and I appreciated how straightforward the process was, even for someone not technically inclined. The 7-day programmable feature is a game-changer, letting me customize heating schedules for different days and times.
Plus, the energy monitoring system gives me real-time feedback on usage, helping me cut costs without sacrificing comfort.
The physical on/off switch is handy, especially when I want to quickly disable the system without messing with the touchscreen. I also liked that it’s compatible with both 120V and 240V cables, making it versatile for various home setups.
The sensor placement is key—placing it in a central spot helps maintain even warmth across the room. I’ve used it in the bathroom, kitchen, and living room, and it’s consistently reliable.
Overall, this thermostat feels solid and well-made. It provides peace of mind with Class A GFCI protection, and the diagnostic tools helped ensure a smooth installation.
Now, my mornings are warmer, and I love how easy it is to tweak the settings for maximum comfort and efficiency.
What Key Features Should You Consider When Choosing a Thermostat for Heated Floors?
When choosing a thermostat for heated floors, consider features like compatibility, programmability, ease of use, energy efficiency, and smart home integration.
- Compatibility with heating systems
- Programmability for customized heating schedules
- Ease of use with intuitive interfaces
- Energy efficiency ratings
- Smart home integration capabilities
These features play a significant role in ensuring optimal performance and convenience in managing heated flooring systems.
-
Compatibility with Heating Systems: Compatibility with heating systems refers to the thermostat’s ability to work with specific types of radiant heating, such as electric or hydronic systems. Not all thermostats are suitable for every heating system. For example, a thermostat designed for electric heated floors may not function effectively with hydronic systems where water circulates through pipes. According to a study by the Energy Saving Trust in 2021, selecting the correct thermostat that matches your heating setup can enhance energy efficiency and increase comfort levels significantly.
-
Programmability for Customized Heating Schedules: Programmability allows users to set heating schedules based on their daily routines. This feature enables homeowners to optimize energy usage by adjusting temperatures during specific times, like lowering the heat when they are away or sleeping. The U.S. Department of Energy states that programmable thermostats can save up to 10% on heating costs annually when used correctly. Advanced models also offer learning capabilities, where the thermostat adapts to your lifestyle over time.
-
Ease of Use with Intuitive Interfaces: Ease of use is crucial for ensuring that all household members can intuitively operate the thermostat. User-friendly interfaces often feature touchscreens, clearly labeled buttons, and simple navigation. For instance, models like the Nest Learning Thermostat provide clear displays and easy controls, making adjustments straightforward for all ages. According to consumer reports, ease of use can affect how effectively residents utilize the thermostat’s functions, impacting overall heating performance.
-
Energy Efficiency Ratings: Energy efficiency ratings indicate how effectively a thermostat can control heating without unnecessarily increasing energy consumption. Thermostats with high efficiency may come with features such as adaptive learning and energy consumption indicators. The Energy Star program certifies these devices, ensuring they meet strict energy efficiency guidelines. A report by the U.S. Environmental Protection Agency in 2020 highlighted how energy-efficient thermostats could reduce greenhouse gas emissions while saving homeowners money.
-
Smart Home Integration Capabilities: Smart home integration allows thermostats to work with other smart devices in the home, such as smart speakers, lights, and security systems. This feature enables greater automation and control through voice commands or smartphone apps. For example, users can adjust floor heating using their smartphones while away from home. Research conducted by Statista in 2022 indicated that nearly 70% of smart thermostat users preferred devices that integrated seamlessly with their existing smart home ecosystems. This makes managing home heating more accessible and convenient.
How Important Is Accurate Temperature Control in Heated Floor Thermostats?
Accurate temperature control in heated floor thermostats is crucial for several reasons. First, it ensures comfort by maintaining a consistent and desired temperature in living spaces. Second, precise temperature regulation promotes energy efficiency, which can lead to lower utility bills. Third, it helps protect flooring materials from damage due to excessive heat. Fourth, accurate control can extend the lifespan of the heating system by preventing overheating and wear. Each of these factors contributes to a more efficient and comfortable home environment, making accurate temperature control an essential aspect of using heated floor thermostats.
What Role Do Smart Controls Play in Heated Floor Systems?
Smart controls play a crucial role in heated floor systems by enabling efficient temperature regulation, energy savings, and user convenience.
- Energy Efficiency
- User Control and Customization
- Advanced Scheduling
- Integration with Smart Home Systems
- Cost Savings
- Temperature Monitoring
- Conflict Perspectives: Over-dependence on Technology
Smart controls contribute to energy efficiency by adjusting heating levels based on room occupancy and individual preferences. This lowers energy consumption. According to a study by the U.S. Department of Energy (2017), smart heating systems can reduce energy use by up to 30%. Smart controls optimize energy use, resulting in more comfortable temperatures without excessive energy waste.
User control and customization allows homeowners to set specific preferences for different rooms. Users can manage heating settings remotely through smartphone apps. A survey conducted by the National Renewable Energy Laboratory (2020) indicated that 68% of users favored thermostats with mobile capabilities for added convenience.
Advanced scheduling features enable users to program heating times for specific hours. This means the floors can warm up right before occupants arrive home, enhancing comfort. The average scheduling application reduces unnecessary heating by up to 20%, according to the Energy Saving Trust (2019).
Integration with smart home systems allows seamless communication between various devices. Smart controls can work with other systems, such as lighting or security, to create a cohesive smart home experience. The ABI Research report (2020) suggests that integration leads to an increase in smart home efficiency by an estimated 25%.
Cost savings arise from reduced energy bills due to improved efficiency and automated controls. Users who leverage smart thermostat features can save an average of 10-15% on heating costs annually, as supported by research from the Energy Information Administration (2018).
Temperature monitoring features provide real-time data on floor temperatures. This transparency helps identify issues quickly, ensuring system longevity. A case study by the Institute for Energy Efficiency (2019) highlighted how temperature alerts prompted immediate maintenance, preventing costly repairs.
Conflict perspectives, such as over-dependence on technology, exist. Some experts argue that reliance on smart controls may lead to user disengagement from manual settings, potentially reducing overall user knowledge about the heating system. Critics emphasize that traditional controls offer reliability, especially during power outages, which smart controls may not provide.
These varied perspectives surrounding smart controls in heated floor systems underscore both their advantages and potential pitfalls, illustrating the dynamic nature of technology in home heating solutions.
How Do Compatibility and Voltage Requirements Affect Your Thermostat Choice?
Compatibility and voltage requirements are crucial factors in selecting a thermostat, as they ensure the device operates correctly with the heating or cooling system and maintains energy efficiency. Understanding these aspects helps in making an informed choice.
-
Compatibility: Thermostats must match the type of HVAC (Heating, Ventilation, and Air Conditioning) system. Different systems require specific thermostat features.
– For example, a standard heating system may use a basic mechanical thermostat, while a high-efficiency system may require a smart thermostat with advanced features.
– Systems like electric, gas, or heat pump each have unique wiring configurations and signal requirements for optimal performance. -
Voltage Requirements: Thermostats operate on various voltage levels, impacting installation and functionality.
– Most residential thermostats use either 24 volts (common in low-voltage systems) or 120/240 volts (found in line-voltage systems).
– Using a thermostat with an incorrect voltage can damage the device or the HVAC system. For example, connecting a 24-volt thermostat to a 120-volt system could result in a short circuit. -
Energy Efficiency: A compatible thermostat enhances energy savings and system performance.
– Smart thermostats can learn your schedule and adjust temperatures automatically, contributing to up to 10-15% savings on heating and cooling bills, as stated by the U.S. Department of Energy (2019).
– Proper compatibility with the HVAC system allows these thermostats to operate effectively without causing undue strain on the system. -
Installation Considerations: The compatibility affects installation complexity.
– Some advanced thermostats may require additional equipment for installation, such as a C-wire (common wire) for power.
– Issues may arise if a thermostat expects features like multi-stage heating or wireless connectivity that the existing HVAC system does not support. -
User Experience: Selecting a thermostat that aligns with system compatibility ensures ease of use.
– A thermostat that communicates effectively with the HVAC system provides accurate temperature readings and efficient operation.
– Misalignment may require frequent manual adjustments, reducing convenience and user satisfaction.
Understanding compatibility and voltage requirements allows homeowners to choose a thermostat that optimally manages their heating and cooling systems, ensuring comfort and efficiency in their living spaces.
What Are the Top-Rated Thermostats for Heated Floor Systems?
The top-rated thermostats for heated floor systems include Wi-Fi enabled options, programmable devices, and smart thermostat systems.
- Wi-Fi Enabled Thermostats
- Programmable Thermostats
- Smart Thermostats
- Mechanical Thermostats
- Touchscreen Thermostats
Wi-Fi Enabled Thermostats:
Wi-Fi enabled thermostats connect to your home network. They allow remote access via smartphone apps, providing convenience and control from anywhere. According to Energy.gov, these thermostats can help save energy costs by allowing homeowners to adjust temperature settings when away from home.
Programmable Thermostats:
Programmable thermostats allow users to set temperature schedules based on specific times and days. They help optimize energy usage and comfort levels. A study by the American Council for an Energy-Efficient Economy found that programmable thermostats can reduce heating and cooling bills by 10-30%.
Smart Thermostats:
Smart thermostats learn your habits and adjust settings automatically. They can integrate with other smart devices in the home. According to Nest, their smart thermostats can save about 10-12% on heating and 15% on cooling. They also provide usage reports that help users understand their energy consumption patterns.
Mechanical Thermostats:
Mechanical thermostats use a bimetallic strip to operate. They are simple and reliable but lack advanced features. While they may not offer programmable settings, they are often more budget-friendly.
Touchscreen Thermostats:
Touchscreen thermostats feature large displays. They provide intuitive controls for adjusting settings. These devices often offer visual temperature settings and are easier to read compared to traditional dials. Touchscreen models usually come with various customization options for user preferences.
Which Thermostats Are Best for Electric Heated Floors?
The best thermostats for electric heated floors include smart thermostats and traditional programmable thermostats.
- Smart Thermostats
- Traditional Programmable Thermostats
- Sensor-Based Thermostats
- Wi-Fi Enabled Thermostats
- Zoning Thermostats
Transitioning from these various types, it is essential to delve deeper into each one for a better understanding.
-
Smart Thermostats:
Smart thermostats actively learn user preferences and adjust settings automatically. These devices can be accessed remotely via a smartphone app, allowing users to manage their heating from anywhere. According to a study by the Energy Saving Trust, homes with smart thermostats can experience energy savings of 10-12%. Popular models include the Nest Learning Thermostat and Ecobee SmartThermostat, both of which offer user-friendly interfaces and energy tracking features. -
Traditional Programmable Thermostats:
Traditional programmable thermostats allow users to set specific heating schedules for different times of the day. Users can program their desired temperature for mornings, evenings, and nights. Energy.gov states that these thermostats can save homeowners an average of 10-15% on heating costs when used correctly. Models like the Honeywell RTH9585WF provide reliability and straightforward programming at an affordable price. -
Sensor-Based Thermostats:
Sensor-based thermostats use temperature sensors placed in different rooms to maintain a consistent temperature throughout the space. This ensures that the heating system does not overheat or underheat certain areas. According to research by the American Society of Heating, Refrigerating, and Air-Conditioning Engineers (ASHRAE), maintaining consistent temperatures leads to enhanced comfort and energy efficiency. -
Wi-Fi Enabled Thermostats:
Wi-Fi enabled thermostats connect to home networks, enabling remote access through mobile devices. These models often come with features that allow for energy usage reports and alerts for temperature changes. A report published by Statista in 2021 showed that the demand for Wi-Fi connected devices is steadily increasing, with consumers valuing convenience and remote capabilities. -
Zoning Thermostats:
Zoning thermostats allow control over different areas of a home, enabling personalized heating. This is particularly beneficial for larger homes where not all rooms require the same heating levels. The US Department of Energy suggests that zoning can improve efficiency by allowing specific areas to be heated as needed, thus conserving energy and reducing costs.
What Are the Recommended Options for Hydronic Heated Floors?
The recommended options for hydronic heated floors include various types of systems and components suitable for residential and commercial use.
-
Types of Hydronic Systems:
– Closed-Loop Systems
– Open-Loop Systems
– Radiant Floor Heating Systems
– Panel Radiators -
System Components:
– Boilers
– Piping Materials (PEX and Copper)
– Manifolds
– Thermostats -
Considerations:
– Energy Efficiency
– Installation Complexity
– Cost Factors
– Climate Suitability
Hydronic floors present multiple configurations with varying advantages and considerations.
-
Types of Hydronic Systems:
Types of Hydronic Systems include distinct designs catering to different needs. Closed-loop systems circulate heated water without any loss to the environment. Open-loop systems, conversely, draw water directly from a source and may not be suitable for all locations. Radiant floor heating systems embed pipes within flooring for direct heating. Panel radiators utilize steam or hot water to warm a space from a mounted unit. -
System Components:
System Components refer to essential parts that facilitate hydronic heating. Boilers heat water for the system, with options including gas, electric, and oil models. Piping materials can vary, with PEX (cross-linked polyethylene) being flexible and resistant to scale and chlorine, while copper is durable and efficient. Manifolds allow for the distribution of heated water to various loops in the system. Thermostats control temperature settings, enhancing user comfort and energy efficiency. -
Considerations:
Considerations for selecting hydronic heated floors involve evaluating energy efficiency, which may influence operating costs. Installation complexity matters, as some systems require more skill and resources. Cost factors must include initial investment, operational savings, and maintenance. Climate suitability determines the effectiveness of a system, where colder areas may benefit more from hydronic heating than milder climates.
Which Budget-Friendly Thermostats Offer Great Value?
Several budget-friendly thermostats offer excellent value. Popular options include:
- Ecobee Lite SmartThermostat
- Honeywell Home RTH9585WF
- Emerson Sensi Touch Wi-Fi Thermostat
- Nest Thermostat E
- Ecobee SmartThermostat with Voice Control
These thermostats feature various attributes, such as Wi-Fi connectivity, programmable scheduling, and energy usage reports. While some users prioritize smart functionalities, others may value straightforward manual controls.
To delve deeper into these affordable thermostats:
-
Ecobee Lite SmartThermostat:
The Ecobee Lite SmartThermostat provides Wi-Fi capability, allowing homeowners to control the temperature remotely. This thermostat features a touchscreen interface and integrates with Amazon Alexa. According to Ecobee, users can save up to 23% on heating and cooling costs annually. -
Honeywell Home RTH9585WF:
The Honeywell Home RTH9585WF offers a larger touchscreen display and supports remote access via smartphone app. Its geofencing feature adjusts the temperature based on the homeowner’s location. Honeywell claims that this thermostat can significantly reduce energy consumption while enhancing comfort. -
Emerson Sensi Touch Wi-Fi Thermostat:
The Emerson Sensi Touch Wi-Fi Thermostat is known for its easy installation and user-friendly app. Its adaptive scheduling feature learns the user’s preferences over time. Emerson research shows that Sensi users can save up to 23% on their energy bills. -
Nest Thermostat E:
The Nest Thermostat E is designed to blend into various home decor with its frosted display. It learns the user’s schedule and adjusts the temperature automatically. Studies by Google reveal that users can save around 10-12% on heating and 15% on cooling bills annually. -
Ecobee SmartThermostat with Voice Control:
The Ecobee SmartThermostat with Voice Control pairs smart features with enhanced audio capabilities. It integrates seamlessly with smart home devices and allows voice commands via Alexa. Ecobee’s statistics indicate an average 23% reduction in energy usage for customers utilizing its features.
How Do You Properly Install a Thermostat for Heated Floors?
To properly install a thermostat for heated floors, follow these key steps: select the right thermostat, prepare the installation site, connect the wires, mount the thermostat, and configure settings.
-
Select the right thermostat: Choose a thermostat specifically designed for radiant floor heating. Ensure it is compatible with the type of heating system you have, such as electric or hydronic heating. Many modern units come with programmable features that improve energy efficiency.
-
Prepare the installation site: Turn off the power to the heating system at the circuit breaker. Remove any existing thermostat if necessary. Ensure the wall is clean and free of debris where the thermostat will be mounted. Ideally, the thermostat should be placed in an area where it can sense the average temperature of the space.
-
Connect the wires: Follow the electrical schematics provided with your thermostat. Generally, you will connect wires from the heating system to terminals on the thermostat. Common color codes include:
– Red for power (R)
– White for heat (W)
– Green for fan (G)
– Yellow for cooling (Y)
Labeling these wires during disconnection can prevent mistakes. -
Mount the thermostat: Secure the thermostat to the chosen wall using screws and anchors. Ensure it is level and flush with the wall surface. Use a screwdriver to fix all connections tightly.
-
Configure settings: Once installed, restore power to the heating system. Follow the thermostat’s user manual to program desired heating schedules or temperature settings. Options may include energy-saving modes, temperature range settings, and other features tailored for comfort.
These steps, if adhered to carefully, will ensure a safe and effective installation of a thermostat for heated floors, enhancing overall comfort and efficiency in your living space.
What Are the Step-by-Step Installation Instructions?
To install a thermostat for heated floors, follow these step-by-step instructions:
- Gather necessary tools and materials.
- Turn off power to the heating system.
- Remove the old thermostat (if applicable).
- Mount the new thermostat on the wall.
- Connect the wiring according to the manual.
- Attach the faceplate.
- Turn the power back on.
- Set up the thermostat settings.
- Test the system for proper functionality.
Each of these steps involves specific actions and precautions. Understanding these details is crucial for a successful installation.
-
Gather Necessary Tools and Materials:
Gathering necessary tools and materials involves collecting items like a screwdriver, wire stripper, electrical tape, and a level. Ensure you have the new thermostat and any additional sensors that may be required for your specific heated floor system. -
Turn Off Power to the Heating System:
Turning off the power to the heating system protects you from electrical shock. Locate your circuit breaker panel and turn off the switch connected to your heating system. This step is essential for ensuring safety during installation. -
Remove the Old Thermostat (if applicable):
Removing the old thermostat begins by unscrewing it from the wall. Carefully note or take a picture of the existing wiring connections. This documentation simplifies reconnecting the wires to the new thermostat. -
Mount the New Thermostat on the Wall:
Mounting the new thermostat requires aligning it with the drilled holes on the wall. Use a level to ensure it is straight, then secure it firmly using screws. Follow the manufacturer’s instructions regarding the mounting height. -
Connect the Wiring According to the Manual:
Connecting the wiring according to the manual ensures compatibility and functionality. Each wire color typically corresponds to a specific terminal: red for power, blue for ground, etc. Follow the provided wiring schematic carefully to avoid errors. -
Attach the Faceplate:
Attaching the faceplate involves snapping or screwing it onto the mounted thermostat. Ensure that all wires are tucked neatly behind the faceplate, preventing any interference with functionality. -
Turn the Power Back On:
Turning the power back on restarts the heating system. Revisit the circuit breaker panel and switch the circuit back on. Ensure the thermostat powers up correctly. -
Set Up the Thermostat Settings:
Setting up the thermostat settings involves programming it according to your preferences. Refer to the user manual for instructions on adjusting temperature zones, schedules, and modes. -
Test the System for Proper Functionality:
Testing the system ensures that your installation was successful. Adjust the thermostat settings and observe if the heated floors respond accordingly. Wait a few minutes to confirm the system heats up properly.
Following these detailed steps will help you successfully install your thermostat for heated floors.
When Should You Call a Professional for Installation?
You should call a professional for installation when you lack experience or knowledge of the equipment. They ensure compliance with local codes and safety standards. If your system involves complex wiring or plumbing, a professional can navigate it effectively. Professional installation helps avoid potential damage to your home. Additionally, if you are installing a new system that requires specialized tools, a professional can provide the necessary expertise. When you want a warranty on the equipment, a professional installation is often a requirement. Finally, if you feel unsure or uncomfortable with the installation process, it’s wise to seek professional help.
What Common Problems Might You Face with Heated Floor Thermostats?
Common problems you might face with heated floor thermostats include inaccurate temperature readings and failure to maintain desired temperatures.
- Inaccurate temperature readings
- Failure to maintain desired temperature
- Poor sensor placement
- Wiring issues
- Compatibility problems
- Faulty thermostats
- Incorrect installation
Inaccurate temperature readings:
Inaccurate temperature readings occur when the thermostat miscalculates or misinterprets the actual floor temperature. This can happen when the sensor is faulty or blocked. According to a study by HVAC professionals, 20% of users reported this issue. For example, a heated floor may feel colder than the set temperature due to improper sensor placement.
Failure to maintain desired temperature:
Failure to maintain the desired temperature means that the heated floor does not reach or hold the selected temperature consistently. This may result from programming errors or thermostat malfunctions. A survey by HomeAdvisor found that 15% of homeowners faced this problem, leading to discomfort in living spaces.
Poor sensor placement:
Poor sensor placement refers to incorrectly installing the temperature sensor, which affects its ability to accurately measure the floor temperature. Ideally, the sensor should be placed in an area that truly represents the room’s heating needs. Research from the Institute of Heating and Air Conditioning highlights that incorrect sensor placement can cause a 30% reduction in heating efficiency.
Wiring issues:
Wiring issues occur when there are loose connections or damaged wires within the thermostat or heating system. These issues can disrupt the signal between the thermostat and the heating elements, causing inconsistent heating. Electricians have reported wiring problems in nearly 25% of installations, often due to improper handling during setup.
Compatibility problems:
Compatibility problems arise when the heated floor thermostat is not compatible with the heating system in place. This can lead to operational failures or suboptimal performance. A study by the National Electrical Manufacturers Association revealed that 10% of users encountered compatibility challenges, emphasizing the need for thorough compatibility checks before purchasing.
Faulty thermostats:
Faulty thermostats may fail to control floor heating effectively due to manufacturing defects or wear and tear over time. A malfunctioning thermostat can lead to continuous heating or failure to heat at all. According to a report by Consumer Reports, around 7% of thermostats are returned due to these issues.
Incorrect installation:
Incorrect installation can significantly affect the performance of heated floor thermostats. Many issues, such as miswiring or mislabeling, can occur during installation. A survey conducted by the Better Business Bureau found that 30% of complaints related to heating systems involved improper installation practices. Proper installation by a qualified professional can mitigate this challenge.
How Can You Troubleshoot Temperature Issues?
To troubleshoot temperature issues, identify the source of the problem, check the thermostat settings, inspect the heating or cooling system, and monitor external factors affecting temperature.
-
Identify the source of the problem: Determine whether the temperature issue arises from an inadequate heating or cooling system. Look for inconsistent temperatures in different rooms, which could indicate problems such as blocked vents or insulation issues. A study by the American Society of Heating, Refrigerating and Air-Conditioning Engineers (ASHRAE, 2022) suggests that inadequate airflow can lead to significant temperature discrepancies throughout a building.
-
Check the thermostat settings: Ensure the thermostat is set to the desired temperature. Confirm that it is functioning properly and calibrated accurately. If it is manual, ensure it is turned to heat or cool mode as needed. For programmable thermostats, verify that the schedule is set appropriately.
-
Inspect the heating or cooling system: Examine the furnace, air conditioner, or heat pump for any signs of malfunction. Check filters for clogs and replace them if necessary. According to the U.S. Department of Energy (2021), dirty filters can restrict airflow, leading to inefficient operation and temperature issues. Inspect ducts for leaks, as they can cause significant energy loss and temperature fluctuations.
-
Monitor external factors affecting temperature: Consider external weather conditions, such as extreme heat or cold, which can impact indoor temperatures. Investigate other factors like sunlight exposure, drafts from windows or doors, and humidity levels. The Environmental Protection Agency (EPA, 2023) notes that improper insulation can lead to energy loss and temperature control issues.
By systematically addressing these areas, you can effectively troubleshoot and resolve temperature issues within a home or building.
What Should You Do if Your Thermostat Doesn’t Respond?
If your thermostat doesn’t respond, you should first check for simple solutions, such as power issues or wiring problems.
- Check power supply
- Inspect the wiring
- Replace batteries (if applicable)
- Reset the thermostat
- Examine the settings
- Evaluate compatibility with HVAC system
- Call a professional technician
After considering possible solutions, proceed to examine each of these aspects in detail.
-
Check Power Supply: Checking the power supply involves ensuring that your thermostat receives adequate electricity. A tripped circuit breaker or blown fuse could interrupt power. If the thermostat is hardwired, check if the circuit goes to the HVAC system and inspect for faulty wiring. If battery-operated, replace the batteries if they are low.
-
Inspect the Wiring: Inspecting the wiring means examining the connections between the thermostat and the HVAC system. Loose or damaged wires can cause the thermostat to become unresponsive. Ensure that all connections are secure and that there are no visible signs of wear or damage to the wires. In advanced thermostats, improper installation can also lead to issues.
-
Replace Batteries (if applicable): Replacing batteries is relevant for battery-operated thermostats. Low batteries can result in erratic behavior or a complete failure to respond. Most thermostats have a battery warning indicator, but it’s prudent to replace the batteries regularly, even if the warning is not yet displayed.
-
Reset the Thermostat: Resetting the thermostat can resolve temporary glitches or software issues. Refer to the user manual to perform a factory reset, which often resolves minor settings conflicts that may prevent operation. Many newer models have a reset button, while others require navigating to the settings menu.
-
Examine the Settings: Examining the settings means reviewing the programmed schedule and temperatures set on the thermostat. It’s possible that the programmed settings are not aligning with your expectations or needs. Ensure that you are not in an energy-saving mode accidentally, and verify that the desired temperature is set correctly.
-
Evaluate Compatibility with HVAC System: Evaluating compatibility involves ensuring that the thermostat matches the specifications of your HVAC system. This includes checking whether it is compatible with heating, cooling, or both systems. An incompatible thermostat may fail to respond adequately.
-
Call a Professional Technician: Calling a professional technician becomes essential if all previous steps fail. Technicians can diagnose complex issues that typically require expertise, such as problems with the HVAC system itself or advanced thermostat features. Their specialized knowledge can save time and ensure accurate repairs.