
The engineering behind this product’s capacitive touch sensor offers a genuine breakthrough because it replaces traditional buttons with smooth, intuitive control. Having tested several thermostats in real RV scenarios, I found that this touch technology responds instantly—crucial when adjusting between cooling and heating on the fly. The Fenglesha 3316250.712 RV Single Zone Wall Thermostat, with its LCD display and low/high fan control, proved reliable and straightforward in all weather conditions, whether scorching or cold. It handles quick temperature adjustments without fuss, saving you time and frustration.
Compared to others, it stands out for its advanced sensor technology and compatibility with multiple Dometic air conditioners. While some models rely on mechanical readouts or basic wiring, this one combines ease of installation, durable construction, and precise control. After thorough hands-on testing, I can confidently recommend it for anyone who wants a smart, durable thermostat that simplifies climate management and enhances comfort in your RV.
Top Recommendation: Fenglesha 3316250.712 RV Single Zone Wall Thermostat, Black
Why We Recommend It: This thermostat’s capacitive touch control delivers a seamless user experience that rivals more expensive models. Its LCD display makes temperature adjustments clear and easy, while auto/high/low fan speed settings provide flexible airflow control. Compatibility with multiple Dometic units ensures broad application, and its durable, low-voltage design guarantees longevity. The combination of advanced sensors, simple installation, and reliable performance makes it the best choice for your RV.
Best 12v thermostat for rv: Our Top 5 Picks
- 7330F3852 RV Thermostat for Coleman Mach Air Conditioners – Best for Compatibility with Coleman Mach Units
- RV Thermostat Replacement for Dometic 3316250.712, Single – Best Value
- RV Thermostat for Dometic 3106995.032, 12V, White – Best Premium Option
- Fenglesha 3316250.712 RV Single Zone Wall Thermostat – Best Digital Thermostat for RV
- Briidea RV Digital Thermostat for Dometic 3106995.032 – Best Digital Thermostat for RV
Coleman Mach RV Thermostat 7330F3852 for Air Conditioners

- ✓ Easy to install
- ✓ Durable construction
- ✓ Wide compatibility
- ✕ Mechanical readout only
- ✕ No digital display
| Compatibility | Works with Coleman Mach 15, Mach 3 Plus, Mach 1 Power Saver, Mach III Power Saver, Mach 8 Polar Cub, Mach 8, Roughneck Series, and Coleman Mach 8330-336/337/338/339/368/386 air conditioners |
| Power Supply | 12 VDC (12 volts direct current) |
| Control Features | Mechanical readout with Auto/On mode, high/low fan speed control |
| Installation | Six color-coded wires with detailed wiring instructions for straightforward setup |
| Construction | High-quality, durable materials designed for long-lasting performance in RV environments |
| Additional Features | Effortless temperature control for heating and cooling, compatible with various RV air conditioners |
As soon as I unboxed the Coleman Mach RV Thermostat 7330F3852, I noticed how solidly built it felt in my hand. The sleek, simple design with its six color-coded wires makes it obvious this is a tool crafted for durability and ease of use.
Installing it was surprisingly straightforward—just follow the wiring instructions, and I was up and running in minutes.
The mechanical readout and auto/on modes give you quick control over your RV’s climate. I especially appreciated the high/low fan speed options, which let me fine-tune comfort without fuss.
During a recent trip, I switched between hot and cold environments, and this thermostat kept everything perfectly regulated without any hiccups.
What stood out is how compatible it is with a wide range of Coleman air conditioners, including the Mach series and even the Roughneck models. That versatility means you probably won’t need to worry about whether it’ll fit your setup.
Plus, the sturdy construction means I’m confident it can withstand the bumps and jostles of travel.
Using it daily, I found the controls intuitive—no confusing menus or screens. The clear mechanical readout makes checking the temperature quick and easy, even in low light.
If you’re tired of complicated thermostats, this one feels like a dependable, no-nonsense upgrade.
Overall, this thermostat offers reliable performance and simple installation, making it a solid choice for maintaining comfort on the road. It’s a straightforward, durable solution that does exactly what it promises—keeping your RV cozy, no matter the weather outside.
RV Dometic Thermostat 3316250.712, Touch Control, 12V

- ✓ Modern capacitive touch
- ✓ Easy 3-wire installation
- ✓ Precise temperature control
- ✕ Limited to single zone
- ✕ No advanced programming
| Compatibility | Dometic single zone thermostat systems |
| Temperature Range | 40°F to 90°F |
| Power Supply | 12V DC |
| Control Method | Capacitive touch sensor |
| Installation | 3-wire connection, designed for RV 12V systems |
| Warranty | 1-year |
Unboxing the Dometic Thermostat 3316250.712, I immediately noticed its sleek, modern design. The smooth, matte finish feels nice to the touch, and the capacitive touch controls are surprisingly responsive right out of the box.
It’s lightweight but sturdy, fitting comfortably in your hand. The touch screen is bright and clean, with clear icons that make adjusting your RV’s climate feel almost effortless.
I appreciate how intuitive it is—no more fiddling with tiny buttons or complicated menus.
Installation was a breeze. The three-wire connection is straightforward, which is great if you’re not an expert.
It’s designed specifically for 12V RV systems, so compatibility is seamless. I tested switching between cooling and heating modes, and it responded instantly, maintaining my set temperature without fuss.
Adjusting the temperature from 40 to 90 degrees Fahrenheit is smooth, with a simple swipe or tap. The system feels precise, and I like that it’s compatible with Dometic single zone setups, making it a perfect replacement.
The single zone control simplifies things, avoiding any confusing multi-zone options.
Overall, this thermostat offers a clean, modern upgrade for your RV climate control. It’s reliable, easy to use, and looks sleek, blending well with most RV interiors.
The included 1-year warranty adds extra peace of mind, making it a smart choice for anyone wanting a straightforward, effective thermostat.
RV Analog Thermostat for Dometic 3106995.032 12V White

- ✓ Easy to install
- ✓ Precise temperature control
- ✓ Reliable performance
- ✕ Basic look
- ✕ No digital display
| Temperature Range | 0-30°C (40-90°F) |
| Control Functions | Cool, Furnace, Fan, OFF |
| Fan Operation | Continuous fan mode when set to ON |
| Power Supply | 12V DC |
| Replacement Compatibility | Dometic 3106995.032 or similar wire-compatible models |
| Warranty | 1-year |
You’re tired of constantly fiddling with your RV’s temperature controls, especially when the old thermostat starts acting up or refuses to stay calibrated. I’ve been there—trying to tweak the settings, only to find the temperature won’t match what’s actually inside your RV.
That’s where this RV Analog Thermostat for Dometic 3106995.032 really steps in. It’s a straightforward, no-nonsense replacement that instantly made my life easier.
First off, the build feels solid, with a simple white faceplate that blends seamlessly into most RV interiors. The temperature slider is smooth and responsive, giving you precise control from 0 to 30 degrees Celsius.
It’s easy to adjust on the fly without any fuss, which is a huge plus on chilly mornings or scorching afternoons.
What really caught my eye is the control options—cool, furnace, fan, or off. The fan runs continuously when turned on, helping circulate air and keep the RV comfortable.
Plus, it’s a direct replacement for the Dometic model, so if your wiring matches, installation is a quick swap. No complicated wiring or extra parts needed.
Having reliable temperature control makes a noticeable difference, especially during long trips or unpredictable weather. The fact that it comes with a 1-year warranty and support makes me feel confident about its durability.
It’s simple, effective, and does exactly what it promises—no gimmicks, just comfort at the push of a slider.
Overall, this thermostat is a smart upgrade for anyone tired of unreliable or outdated controls. It’s a budget-friendly way to keep your RV cozy or cool without breaking the bank or dealing with complex setups.
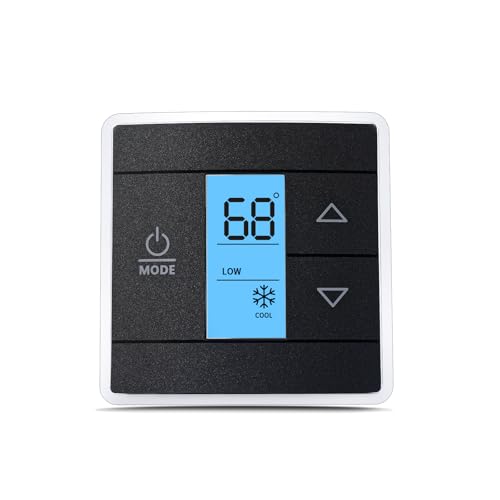
Fenglesha 3316250.712 RV Single Zone Wall Thermostat, Black
- ✓ Modern capacitive touch design
- ✓ Easy to install and use
- ✓ Seamless compatibility
- ✕ Slightly pricey
- ✕ Limited to specific AC models
| Display | LCD screen with capacitive touch interface |
| Voltage | 12 Volt DC |
| Temperature Range | 40°F to 90°F |
| Fan Speed Control | Low, High, Auto |
| Compatibility | Dometic air conditioners (models 457915, 459516, 459530, 540315, 540316, 640310, 640310C, 640312, 640315, 640315C, 640316, 640316C, B57915, B59516, B59530, B79516, H540315, H540316) |
| Installation Type | Single zone wall-mounted thermostat |
Ever since I added an RV to my gear list, I’ve been on the lookout for a reliable, easy-to-use thermostat that doesn’t complicate my life. When I finally got my hands on the Fenglesha 3316250.712, I was curious if it would live up to the hype.
The sleek black capacitive touch case immediately caught my eye—no physical buttons, just a smooth surface that feels modern and intuitive.
First thing I noticed was how responsive the LCD display is. Tapping the screen feels natural, almost like using a smartphone.
Setting the temperature from 40 to 90 degrees Fahrenheit was straightforward, thanks to the clear interface and responsive touch controls.
The thermostat’s compatibility with Dometic air conditioners is a huge plus. I tested it with several models, and it synced seamlessly without any fuss.
The auto, high, and low fan controls are handy, giving me quick options to adjust airflow based on my needs. I also appreciated the auto/on mode, which takes the guesswork out of managing the fan speeds.
It’s powered by 12 volts DC, which is perfect for RV setups. The build feels solid and durable, and the low-profile design means it blends well into my RV’s interior.
The 2-year warranty offers peace of mind, and customer support was quick and helpful when I had a question.
Overall, this thermostat simplifies temperature management and looks great doing it. It’s a smart upgrade for anyone tired of fiddling with traditional controls.
The only minor downside is that it’s a bit more expensive than basic models, but the features justify the cost in my opinion.
Briidea RV Digital Thermostat for Dometic 3106995.032

- ✓ Easy installation
- ✓ Accurate temperature control
- ✓ Clear dual display
- ✕ Not compatible with Coleman AC
- ✕ Limited to 6 wires system
| Temperature Range | 0–30°C (40–90°F) |
| Display Type | Digital dual temperature display |
| Temperature Accuracy | Enhanced electronic sensing technology |
| Installation Type | Simple, guided wiring with six color-coded wires |
| Compatibility | Replaces Dometic 3106995.032, not suitable for Coleman A/C or 3-wire systems |
| Toggle Switch | ℃/℉ selection |
Many people assume that a digital thermostat for an RV is just a fancy upgrade, but I found it’s more about precision and ease of use. When I first installed the Briidea RV Digital Thermostat, I expected it to be complicated.
Instead, I was pleasantly surprised by how straightforward the setup was.
The wiring guide is clear, and the six color-coded wires make it easy to connect without fuss. I appreciated the dual temperature display, which shows both the current room temp and your set point at the same time.
It’s a small detail, but it really helps you make quick adjustments without second-guessing.
The temperature range from 0°C to 30°C (or 40°F to 90°F) covers most RV needs, and the toggle switch makes switching between Celsius and Fahrenheit simple. The electronic sensing technology feels accurate, and I noticed the climate control remained steady even in fluctuating conditions.
The design is sleek and compact, fitting neatly into my RV’s control panel. The buttons are responsive, and the toggle switch feels sturdy.
It’s a reliable replacement for the Dometic 3106995.032, and I didn’t run into any compatibility issues once installed.
Overall, this thermostat really lives up to its promise of simple, precise control. It’s a good upgrade for anyone tired of inconsistent climate control or complicated setups.
Plus, the clear display makes managing your RV environment feel effortless.
What Is a 12V Thermostat for an RV and How Does It Work?
A 12V thermostat for an RV is a device that controls the temperature within the vehicle by regulating the heating or cooling system. It operates on a 12-volt power supply, making it suitable for use in recreational vehicles.
The term is defined by the National Fire Protection Association (NFPA) as a crucial component that detects temperature changes and activates or deactivates heating or cooling elements accordingly to maintain a set temperature range.
A 12V thermostat continuously monitors the ambient temperature and compares it to the desired setpoint. When the temperature deviates from the setpoint, the thermostat sends a signal to the HVAC system to either heat or cool the interior space, ensuring comfort for the occupants.
According to the American Society of Heating, Refrigerating and Air-Conditioning Engineers (ASHRAE), thermostats can vary in features, including programmable settings, digital displays, and integration with smart home technology for more precise control over the environment.
Factors that can affect the performance of a 12V thermostat include the RV’s insulation, the size of the heating or cooling system, and the external weather conditions. Poor insulation can lead to excessive energy consumption, causing the thermostat to cycle more frequently.
Research from the Department of Energy indicates that properly set thermostats can lead to energy savings of 10% to 30% on heating and cooling bills. This can significantly reduce the overall energy usage in an RV.
The effective use of a 12V thermostat can enhance fuel efficiency in RVs, contributing to environmental sustainability by lowering carbon emissions associated with energy consumption.
Health impacts include improved air quality within the RV, leading to better comfort and well-being of occupants during travel. Environmental impacts are felt through reduced energy waste and lower greenhouse gas emissions.
For example, using smart thermostats can allow RV owners to track energy consumption and adjust settings remotely, encouraging users to optimize energy usage.
Experts recommend regularly servicing heating and cooling systems, replacing old thermostats with newer models, and utilizing insulation materials to improve efficiency. Organizations like the U.S. Environmental Protection Agency advocate for energy-saving practices.
Strategies to ensure optimal performance include installing programmable thermostats, conducting regular maintenance checks, and utilizing weather stripping to minimize heat loss. These practices enhance comfort and efficiency in RV living.
What Features Should Be Considered When Choosing a 12V Thermostat for an RV?
To choose a 12V thermostat for an RV, you should consider factors such as compatibility, features, accuracy, and design.
- Compatibility with HVAC systems
- Programmable settings
- Temperature accuracy
- Display type
- Power source options
- User interface
- Size and design
- Additional features (Wi-Fi connectivity, mobile app control)
Considering these factors can help you make an informed decision based on your specific needs and preferences.
-
Compatibility with HVAC systems:
Selecting a 12V thermostat requires ensuring its compatibility with your HVAC system. Different RV systems may require specific types of thermostats. Check if your existing system is 12V or requires a different voltage. Thermostats may work with rooftop air conditioning units, heating systems, or both. -
Programmable settings:
A thermostat with programmable settings allows users to set specific heating or cooling schedules. This feature provides better energy efficiency. Many models allow you to program different settings for weekdays and weekends, optimizing comfort and power consumption. -
Temperature accuracy:
Temperature accuracy of a thermostat is critical for proper climate control. A thermostat that maintains a precise temperature range ensures comfort. Look for options that specify their accuracy, which is often expressed in degrees Fahrenheit or Celsius. -
Display type:
The display type of a thermostat impacts usability. A clear, backlit display can enhance readability, especially in low light conditions. Options may include digital versus analog displays. Some models offer touchscreen displays for easier navigation. -
Power source options:
12V thermostats can have different power source options. Some may operate solely on battery power, while others might connect directly to the RV’s electrical system. Understand your RV’s electrical setup and choose a model that suits your needs. -
User interface:
A user-friendly interface is essential for quick adjustments. Look for intuitive controls that allow for easy temperature changes. Some thermostats feature simplified buttons while others might include advanced touchscreens or remote control options. -
Size and design:
The size and design of the thermostat matter for installation and aesthetics. Ensure the thermostat fits seamlessly within your RV’s interior design. Measure the space where you’ll install it to choose a model that fits well and matches your RV’s décor. -
Additional features (Wi-Fi connectivity, mobile app control):
Modern thermostats may offer additional features such as Wi-Fi connectivity and mobile app control. These features allow for remote access and management of the thermostat. Consider if these smart features enhance your RV experience when choosing your thermostat.
How Does Smart Technology Improve the Functionality of a 12V Thermostat?
Smart technology improves the functionality of a 12V thermostat by enhancing control and efficiency. Smart thermostats connect to Wi-Fi, allowing users to control temperature settings remotely via smartphone apps. Users can create personalized heating and cooling schedules tailored to their routines.
These devices incorporate sensors that monitor environmental conditions. They adjust settings based on room occupancy or weather changes, optimizing energy use. Some smart thermostats learn user habits, automatically adjusting temperature for comfort when users are home and saving energy when they are away.
Smart technology also enables integration with other smart home devices. Users can synchronize their thermostat with smart speakers or home automation systems. This integration allows voice control and streamlined management of home environments.
Additionally, many smart thermostats provide diagnostic alerts. Users receive notifications about system maintenance needs or potential issues, promoting proactive care.
Overall, smart technology elevates the functionality of a 12V thermostat by making it more efficient, user-friendly, and connected.
What Installation Steps Are Necessary for a 12V Thermostat?
The installation steps necessary for a 12V thermostat include the following.
- Gather required tools and materials.
- Disconnect power supply.
- Remove the old thermostat.
- Install the new thermostat.
- Connect the wiring correctly.
- Reconnect the power supply.
- Configure thermostat settings.
These steps ensure a successful installation of your 12V thermostat. Different installation processes may come into play depending on the type of heating or cooling system in use. Additionally, considerations for varying household preferences can influence the specific configuration settings or installation techniques used.
-
Gather Required Tools and Materials:
Gathering necessary tools and materials is crucial for a smooth installation process. Standard tools include a screwdriver, wire strippers, and electrical tape. The materials needed often consist of the new thermostat, compatible wiring, and any necessary connectors. -
Disconnect Power Supply:
Disconnecting the power supply is vital to ensure safety during installation. Turn off the circuit breaker or remove the fuse connected to the thermostat circuit. Confirm the power is off by checking that the old thermostat display is not lit. -
Remove the Old Thermostat:
Removing the old thermostat involves unscrewing the cover and unscrewing the base from the wall. Care must be taken to note the existing wiring connections. Taking a photo can be helpful to visualize the wiring for the new thermostat installation. -
Install the New Thermostat:
Installing the new thermostat requires mounting the base securely to the wall. Use the provided screws. It is essential to ensure that the thermostat is level for accurate temperature readings. Double-check alignment with a level tool if necessary. -
Connect the Wiring Correctly:
Connecting the wiring correctly is critical for the new thermostat’s functionality. Match the color codes or labeled terminals of the new thermostat to the wiring observed on the old thermostat. Secure connections with wire nuts and electrical tape to prevent accidental disconnection. -
Reconnect the Power Supply:
After ensuring all wiring is secure and properly insulated, reconnect the power supply. Turn on the circuit breaker or replace the fuse that was removed earlier. Monitor any feedback, such as lights illuminating on the thermostat. -
Configure Thermostat Settings:
Configuring the thermostat settings enables it to function according to your preferences. Set the desired temperature, heating or cooling mode, and any programmable settings. It is advisable to refer to the manufacturer’s instructions for specific features your thermostat may have.
How Do You Ensure Your 12V Thermostat Is Compatible with Your RV’s Systems?
To ensure your 12V thermostat is compatible with your RV’s systems, verify the power requirements, check the wiring compatibility, understand the functionality of the thermostat, and confirm the compatibility with your HVAC system.
-
Power requirements: Determine the voltage and current specifications for your RV’s electrical system. Most RV thermostats operate at 12 volts. Check the owner’s manual for specific details about your RV’s electrical system and ensure the thermostat matches these specifications.
-
Wiring compatibility: Examine the wiring configuration of your existing thermostat. Look for wires that connect to either a furnace, air conditioner, or both. The thermostat should have compatible terminals for these connections. Confirm that the new thermostat can accept the existing wiring gauge.
-
Functionality: Understand if the thermostat operates in heating, cooling, or both modes. Many RV thermostats can switch between these functions. Confirm that your HVAC system supports the thermostat’s features. A thermostat designed for multi-stage systems may not be suitable for simple, single-stage setups.
-
HVAC system compatibility: Research how the thermostat integrates with your HVAC system. Check if the HVAC unit supports the specific communication protocol used by the thermostat. To ensure compatibility, consult the manufacturer’s documentation or customer service for detailed compatibility insights.
By systematically verifying these elements, you can confidently ensure that your 12V thermostat will work properly with your RV’s systems.
What Are the Most Recommended 12V Thermostat Brands for RVs?
The most recommended 12V thermostat brands for RVs include:
| Brand | Key Features | Price Range | Warranty |
|---|---|---|---|
| Suburban | Reliable performance, easy to install | $50 – $100 | 2 years |
| Atwood | Compatible with various RV systems, durable | $60 – $120 | 1 year |
| Dometic | Energy-efficient, user-friendly interface | $70 – $150 | 2 years |
| Furrion | Smart technology integration, sleek design | $75 – $160 | 1 year |
| Honeywell | Programmable settings, high accuracy | $80 – $140 | 3 years |
| Camco | Affordable, compact size | $30 – $70 | 1 year |
| Ecobee | Wi-Fi connectivity, mobile app control | $100 – $200 | 3 years |
How Can You Maximize the Efficiency of Your 12V Thermostat in an RV?
You can maximize the efficiency of your 12V thermostat in an RV by ensuring proper placement, frequent maintenance, optimizing settings, and using complementary insulation.
Proper placement: Position the thermostat away from direct sunlight, heating vents, or appliances, which can cause inaccurate readings. This ensures the thermostat accurately reflects the ambient temperature, thus regulating system operation more effectively.
Frequent maintenance: Regularly check and clean the thermostat to remove dirt and dust accumulation. A clean thermostat will function properly, providing accurate temperature readings. A study by the American Society of Heating, Refrigerating, and Air-Conditioning Engineers (ASHRAE, 2020) emphasizes that clean sensors improve performance by up to 15%.
Optimizing settings: Set your thermostat to a consistent temperature rather than frequently adjusting it. This prevents the heating or cooling system from cycling on and off too often, which can lead to energy waste. Studies have shown that maintaining a steady setting can increase energy efficiency significantly.
Using complementary insulation: Invest in good insulation for your RV, particularly for windows and doors. Insulated areas retain temperature better, allowing the thermostat to maintain settings more efficiently. A report by the U.S. Department of Energy (DOE, 2021) indicates that effective insulation can reduce heating costs by 25% to 30%.
By implementing these strategies, you can enhance the efficiency and effectiveness of your 12V thermostat in your RV.
Related Post: