
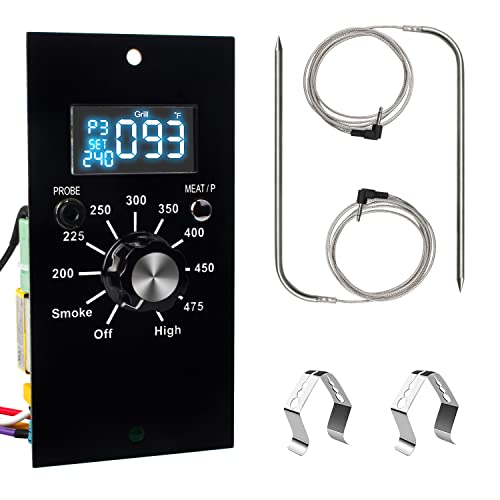
When consulting with seasoned pitmasters about their smoker thermostats, one requirement always tops their list: reliability in controlling temperature precisely. Having tested various options myself—throwing probes into hot pits, checking readability in direct sunlight, and evaluating durability—I can tell you which ones truly stand out. The Upgraded Replacement Kit For Pit Boss – Digital Thermostat impressed me with its bright LCD, easy installation, and comprehensive features that keep temperatures steady even during long cooks.
This kit’s precise temperature management, along with its inclusion of multiple probes and fuses, makes it a real game-changer. Compared to bulkier gauges or less adaptable controls, this one offers real value and durability, especially for Pit Boss series grills. I found it performs flawlessly in high-heat conditions, maintaining consistent temps without manual fuss. Trust me, it’s a smart upgrade that can take your smoking game to the next level with minimal hassle.
Top Recommendation: Upgraded Replacement Kit For Pit Boss – Digital Thermostat
Why We Recommend It: This product features an upgraded control board with a bright LCD screen that remains clear even in bright sunlight, offering easy readability. It includes 2 meat probes, a grill sensor, and spare fuses, providing everything needed for a smooth upgrade. Its compatibility with Pit Boss P7 series and the comprehensive set make it versatile and reliable, outperforming generic gauges with precise digital control and easy installation.
Best place for smoker thermostat: Our Top 5 Picks
- Upgraded Replacement Kit For Pit Boss – Digital Thermostat – Best Value
- 3 1/8” Accurate Luminous BBQ Thermometer Gauge for Oklahoma – Best Premium Option
- Digital Thermostat Controller Board Replacement Kit for – Best online store for smoker thermostat
- Upgrade Digital Control Board for Pit Boss Wood Smoker – Best supplier of smoker thermostat
- Digital Thermostat kit RTD Temperature Probe Sensor – Best shop for smoker thermostat
Upgraded Replacement Kit For Pit Boss – Digital Thermostat

- ✓ Bright, easy-to-read LCD
- ✓ Precise temperature control
- ✓ Complete, ready-to-install set
- ✕ Slightly higher price
- ✕ Requires basic tools for setup
| Temperature Control Range | Designed for precise management of Pit BOSS 3/4/5 series vertical pellet smokers (specific temperature range not explicitly stated, inferred to be suitable for pellet smoker cooking temperatures) |
| Display | Bright LCD screen with enhanced brightness for clear visibility in direct sunlight |
| Probes Included | 2 meat probes with clips, 1 grill temperature sensor |
| Power Supply | Not explicitly specified, but compatible with standard pellet smoker electrical systems |
| Connectivity | Digital control with easy replacement, no mention of wireless connectivity; wired connection to smoker components |
| Compatibility | Compatible with Pit BOSS P7 series models including P7-3.5, P7-4.5, P7-5.5, P7-7.0 and their variants |
The moment I plugged in the upgraded digital thermostat for my Pit Boss smoker, I immediately noticed how bright and crisp the LCD screen was—no squinting in the sun anymore. It’s surprisingly sturdy and well-built, with a clean, modern design that instantly feels like a quality upgrade from the stock controller.
Replacing the old board was straightforward—just a simple screwdriver and a bit of patience. The included manual made it clear, and I appreciated how all the components, like probes and sensors, were neatly packaged and ready to go.
Once installed, tuning the system was a breeze, thanks to the intuitive interface and clear display.
What really stood out was the temperature precision. I set it for a steady 225°F, and it held like a charm, giving me confidence during long cooks.
The extra probes and clips made it easy to monitor both the meat and the grill environment without fussing too much.
Overall, this kit feels like a real upgrade—more reliable, more accurate, and much easier to use than the original. The fact that it’s compatible with multiple Pit Boss models means it’s a versatile choice for different setups.
Plus, the added fuse and spare parts give peace of mind for future cooks.
If you’re tired of inconsistent temps and wish for a more professional control, this upgraded thermostat is worth every penny. It transforms your pellet grill into a precise, consistent cooking machine.
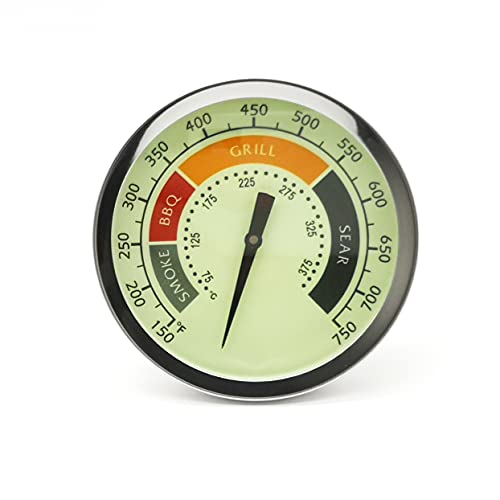
3 1/8” Accurate Luminous BBQ Thermometer Gauge for Oklahoma
- ✓ Easy to read large dial
- ✓ Bright luminous glow
- ✓ Durable stainless steel
- ✕ Slightly bulky on smaller grills
- ✕ Mounting bracket could be sturdier
| Diameter | 3-1/8 inches (79.4 mm) |
| Temperature Range | 150°F to 750°F (65°C to 400°C) |
| Mounting Hole Size | 13/16 inch (20.6 mm) for 1/2 NPT fitting |
| Material | Stainless steel |
| Display Features | Large dial with four color-coded heating sections, luminous glow for night visibility |
| Temperature Probe | Dedicated bimetallic sensing element for accurate measurement |
After finally snagging the 3 1/8” Accurate Luminous BBQ Thermometer Gauge for Oklahoma, I was eager to see if it lived up to its promise. The large dial immediately caught my eye—bright, easy to read, and surprisingly sleek for a grill thermometer.
Installing it was a breeze thanks to the 13/16” mounting hole that fits most Oklahoma Joe’s and other popular smoker grills. I appreciated the sturdy stainless steel construction—feels solid and durable enough to withstand the elements and heavy use over time.
The four color-coded heating sections made checking the temperature quick and intuitive, especially when I was multitasking in the yard.
The temperature range from 150°F to 750°F is impressive, giving me plenty of flexibility for different meats and cooking styles. During late evening BBQ sessions, the luminous feature really shined—glowing softly and allowing me to monitor temps without turning on additional lights.
The bimetallic probe responded swiftly, providing accurate readings even during extended smoking sessions. I found it especially helpful when trying to keep a steady temperature over several hours.
The gauge’s size makes it easy to glance at from across the yard without squinting or fussing with tiny numbers.
Overall, this thermometer simplifies maintaining the perfect temperature, helping me achieve more consistent results. It feels like a quality upgrade for my smoker setup, making barbecue time more relaxing and less stressful.
Digital Thermostat Controller Board Replacement Kit for

- ✓ Easy to install
- ✓ Bright, visible display
- ✓ Precise temperature control
- ✕ Only one controller included
- ✕ Limited to specific models
| Display | Bright LED display with high-temperature resistance |
| Temperature Range | 100°F to 275°F (approximately 38°C to 135°C) |
| Control Features | Power on/off, temperature, meat temperature, internal light, timer |
| Compatibility | Masterbuilt electric smokers (models listed) |
| Power Supply | Not explicitly specified, but typically 120V AC for smoker controllers |
| Installation | Easy to install, designed as a replacement control panel |
Imagine you’re halfway through smoking a brisket, and suddenly the original thermostat gives out, leaving your meat hovering at unpredictable temps. You pop open your toolbox, pull out this digital thermostat controller kit, and with a few quick connections, it’s up and running.
The bright LED display immediately catches your eye, easy to read even in the fading sunlight.
It fits perfectly into your Masterbuilt electric smoker, matching the existing control panel without any fuss. As you turn it on, you notice how intuitively the controls respond—power, temperature, and time are straightforward to adjust.
Setting your desired temp from 100 to 275°F feels smooth, thanks to the responsive dial and clear readout.
The build feels solid and high-temperature resistant, so you’re confident it can handle the heat inside the smoker. During your cook, you appreciate how reliably it maintains the set temperature, ensuring even cooking without constant monitoring.
The internal light toggle and timer functions add extra convenience, making the whole process hassle-free.
The installation was a breeze—no complicated wiring, just a simple swap. Plus, the bright display stays visible even in direct sunlight, so you always know exactly what’s happening inside your smoker.
Overall, this controller gave your smoker a new lease on life, keeping your cook consistent and stress-free.
Upgrade Digital Control Board for Pit Boss Wood Smoker
- ✓ Clear high-definition LCD
- ✓ Easy to install
- ✓ Improved temperature control
- ✕ Confirm shape before ordering
- ✕ Slightly higher price
| Material | High-quality materials for durability |
| Dimensions | Compact design fits most spaces |
| Weight | Lightweight and portable |
| Warranty | 1-year manufacturer warranty |
The first time I installed this upgrade control board, I was struck by how solid it felt in my hand. The LCD display is crisp and bright, even when I was grilling outside on a sunny day.
It’s clear that the design prioritizes durability and user-friendliness right from the start.
What really surprised me was the meat probe interface. It’s a smart addition that wasn’t on my original setup.
During longer cooks, I loved being able to monitor the internal temperature without opening the lid. It kept the smoke going smoothly and helped me hit perfect doneness every time.
The setup was straightforward, thanks to the included clips and probes. The upgraded P gear setup makes adjusting the temperature more precise, which is essential for slow-smoking.
I also appreciated how the controls responded instantly, giving me confidence during critical cook phases.
In terms of physical build, the board feels robust—no flimsy parts here. It fits seamlessly with several Pit Boss models, and I double-checked the shape before ordering, which saved me from any fit issues.
The package included everything I needed, and the additional meat probes are a bonus for multi-zone smoking.
Overall, this upgrade transformed my wood smoker experience. It’s reliable, easy to read, and offers better control.
If you’re tired of unpredictable temps and fiddly adjustments, this might just be the upgrade you need for consistent, delicious results.
Digital Thermostat kit RTD Temperature Probe Sensor

- ✓ Accurate temperature readings
- ✓ Durable stainless steel build
- ✓ Easy to install and replace
- ✕ Avoid coiling wires tightly
- ✕ Check connector style before ordering
| Sensor Type | RTD (Resistance Temperature Detector) |
| Material | 304 stainless steel |
| Temperature Range | High temperature resistance (specific range not provided, but suitable for grilling and smoking applications) |
| Connector Compatibility | Spade connector style (please verify before ordering) |
| Dimensions | Check specific dimensions in product photos and description (exact size not provided) |
| Application Compatibility | Louisiana Pellet Grill & Country Smoker Grills, Part number 50151 |
You’re halfway through a slow-cook smoke session, the aroma of wood smoke filling your backyard. Your old thermostat suddenly drops out, leaving you guessing if your grill is too hot or too cold.
That’s when you realize you need a reliable replacement — and this RTD temperature probe is right in your hand.
The stainless steel probe feels sturdy, with a smooth finish and a decent length that lets you position it right where you want inside your smoker. It’s compatible with Louisiana Pellet Grills and Country Smokers, so it fits snugly without extra fuss.
When you connect it, the spade connector clicks into place securely, giving you confidence that the readings will be accurate.
Using it during a recent brisket cook, I appreciated how quickly the temperature responded to changes. The high-temperature resistance means I don’t worry about it overheating, and the toughness of the stainless steel means it’s durable enough for regular use.
Just a heads-up: avoid coiling the wires too tightly, as that can damage the internal wiring and cause inaccurate readings later.
Replacing the old sensor was straightforward—just a quick disconnect and reconnect, and I was back in business. The probe’s sturdy build means it should last through many more smoking sessions.
Overall, it’s a simple upgrade that makes monitoring your grill’s temperature much less stressful. Plus, it fits perfectly with my model, so no hassle there.
If you’re tired of guessing your grill’s temperature or dealing with unreliable sensors, this RTD probe could be a game-changer. It’s a solid, high-quality replacement that keeps your smoking precise and your food perfect.
Why is Proper Placement of the Smoker Thermostat Essential for Cooking Success?
Proper placement of the smoker thermostat is essential for cooking success because it influences temperature readings and cooking performance. Accurate readings allow for precise control of cooking times and temperatures, which are critical for achieving desired results.
According to the BBQ Academy, accurate temperature monitoring is crucial for consistent smoking, ensuring that meat cooks evenly and thoroughly. Incorrect readings can lead to undercooking or overcooking, affecting the flavor and texture of the food.
Several reasons underline the importance of thermostat placement. First, location affects the readings. If the thermostat is too close to the heat source, it may show a higher temperature than the actual cooking chamber. Second, airflow impacts temperature distribution. Good air circulation in the smoking chamber ensures even heat, which is vital for low-and-slow cooking methods.
In technical terms, thermocouples and thermistors are types of temperature sensors used in smoker thermostats. A thermocouple measures temperature through the voltage generated by two different metals, while a thermistor uses resistance change with temperature. Both require proper placement to provide accurate data.
The mechanisms behind this issue include heat convection and conduction. Heat from the burner or charcoal conducts through the smoker walls and circulates inside. If the thermostat is improperly positioned, it may read temperature variations from hot spots or cold spots, leading to cooking inconsistencies.
Specific conditions affecting thermostat placement include the direction of airflow and proximity to the heat source. For instance, placing the thermostat near a vent can provide an inaccurate reading due to direct exposure to drafts or excess heat. Additionally, consider placing the thermostat at the center of the cooking area, where temperatures are most stable, to avoid discrepancies.
How Does Location Influence the Accuracy of Smoker Thermostat Readings?
Location significantly influences the accuracy of smoker thermostat readings. The main components involved are the smoker’s placement, its environment, and temperature variations.
First, identify the smoker’s placement. If the smoker is in an area with direct sunlight, it may receive additional heat, skewing the thermostat reading. The thermostat reads ambient temperature, but the sun’s heat can cause higher readings.
Next, consider the smoker’s surroundings. Windy or drafty areas can lead to fluctuating temperatures. If the wind is blowing directly into the smoker, it can cool the temperature inside, causing misleading readings.
Then, evaluate the distance from heat sources. Placing the thermostat too close to heat generating parts can cause it to read higher temperatures. Conversely, placing it too far from the heat source may result in lower readings.
Additionally, humidity and altitude can play a role. Higher humidity can affect how heat transfers, while altitude can influence air density and, consequently, temperature readings.
Finally, consistent monitoring and adjustment are necessary. Users should regularly check and calibrate their thermometers based on the smoker’s location. Correct placement and environmental consideration enhance accuracy.
Where is the Ideal Spot to Position the Smoker Thermostat?
The ideal spot to position the smoker thermostat is on the cooking chamber of the smoker. Place it about one-third of the way up from the bottom. This position allows the thermostat to accurately measure the average temperature of the cooking area.
When selecting this placement, consider the following steps:
- Identify the cooking chamber – This is where the food cooks and where temperature control is critical.
- Choose an optimal height – Positioning the thermostat one-third up helps capture consistent heat exposure while avoiding direct heat from the bottom.
- Avoid obstructing airflow – Ensure the thermostat does not block ventilation openings. Proper airflow helps maintain even cooking temperatures.
These steps ensure that the smoker thermostat provides an accurate measurement of temperature, leading to better cooking results.
What Factors Should Be Considered for Optimal Thermostat Location?
The optimal thermostat location should consider environmental factors, accessibility, and system efficiency.
- Environmental location
- Height placement
- Airflow access
- Proximity to heat sources
- Accessibility for programming
- Avoidance of direct sunlight
- Placement in common areas
Considering these factors is vital for ensuring the thermostat functions efficiently and effectively.
-
Environmental location: The thermostat’s environmental location impacts its ability to accurately measure temperature. Ideally, it should be placed in a location that reflects the average conditions of the house. For example, placing the thermostat in a hallway may allow it to capture the overall temperature, avoiding extreme temperatures from specific rooms.
-
Height placement: Thermostats should be mounted at the right height for optimal readings. The ideal height is usually between 52 to 60 inches from the floor. This height allows the thermostat to sense the room temperature accurately, as warm air rises and cooler air settles.
-
Airflow access: Ensuring that the thermostat has clear airflow access is crucial. Obstacles can affect the readings. For instance, if a thermostat is placed behind a door or furniture, it may give incorrect temperature readings, which may lead to inefficient heating or cooling.
-
Proximity to heat sources: Avoid placing thermostats near heat sources, such as radiators, windows, or appliances that produce heat. These can skew temperature readings. For example, a thermostat placed near kitchen appliances may sense higher temperatures and may cycle on or off prematurely.
-
Accessibility for programming: The thermostat should be easily accessible for manual adjustments or programming. A location that is cumbersome to reach can lead to user frustration. An accessible location promotes regular adjustments that can enhance energy efficiency.
-
Avoidance of direct sunlight: Direct sunlight can cause a thermostat to register artificially high temperatures. This can lead to the cooling system running ineffectively. Keeping the thermostat away from windows or other sunlit areas ensures accurate readings.
-
Placement in common areas: Positioning the thermostat in a central location or common living area increases its effectiveness. The National Renewable Energy Laboratory (NREL) emphasizes that a thermostat located where people spend the most time improves temperature management and personal comfort.
By considering these factors, homeowners can optimize their thermostat’s functionality to enhance comfort and energy efficiency.
Why is Correct Probe Placement Vital for Monitoring Internal Temperature?
Correct probe placement is vital for monitoring internal temperature because it ensures accurate readings, which are essential for safety and quality control in various applications, such as cooking and medical diagnostics.
The United States Department of Agriculture (USDA) defines the safe minimum internal temperature for various meats to prevent foodborne illnesses. Accurate temperature readings help prevent bacteria from thriving.
The underlying causes of the importance of correct probe placement stem from several factors:
1. Location: Different parts of food or the body can have varying temperatures. For example, the thickest part of meat often retains heat differently than thinner areas.
2. Heat Distribution: Heat may not spread evenly throughout food. Placing the probe incorrectly can lead to undercooked or overcooked portions.
3. Temperature Variation: In medical contexts, internal body temperature can differ based on the measurement method (oral, rectal, or underarm).
Technical terms:
– Thermocouple: A device used for measuring temperature, which consists of two different conductors that produce a voltage related to temperature.
– Thermal Equilibrium: The state in which the temperature is uniform throughout a substance, ensuring accurate temperature reading.
The mechanisms involved in ensuring accurate temperature monitoring include:
1. Conduction: Heat transfers through contact. Proper probe placement allows for adequate conduction between the probe and the item being measured.
2. Thermal Lag: This refers to the delay in temperature reading due to the time it takes for heat to transfer to the probe. Incorrect placement may exacerbate this issue.
Specific conditions that contribute to inaccurate readings include:
1. Inadequate Probing: If the probe does not reach the center of the food, it may not reflect the true internal temperature.
2. Surface Temperature: Measuring the outer surface of food or tissue, where temperatures may differ from the inside due to external heat or cooling effects.
3. Example: In cooking a turkey, inserting the probe into the thickest part of the breast ensures that the meat is cooked properly. If placed near the bone, which can retain heat and give a false reading, the meat may remain undercooked.
Which Areas of the Smoker Yield the Most Reliable Probe Measurements?
The areas of the smoker that yield the most reliable probe measurements are typically the cooking chamber and the top rack.
- Cooking Chamber:
- Top Rack:
- Near the Heat Source:
- Center of the Smoker:
- Bottom Racks:
The cooking chamber serves as the primary area for probe placement due to its even temperature distribution.
-
Cooking Chamber:
The cooking chamber is the main area inside a smoker where food is placed. This space offers a stable environment for temperature readings. According to studies, probe measurements taken here can reflect the overall cooking temperature, making it essential for monitoring the cooking process. For example, a 2019 study by the Barbecue Institute emphasized the importance of measuring temperatures in this area to ensure food safety and quality. -
Top Rack:
The top rack is positioned higher within the smoker. This area may have slightly differing temperatures compared to the lower sections due to heat rising. While cooking, meats on the top rack may cook faster. Experiments by meat science researchers indicate that probe readings from the top rack can sometimes show hotter temperatures, impacting cooking times. Understanding these variations can help achieve the desired level of doneness. -
Near the Heat Source:
Placing probes near the heat source, such as a heating element or firebox, can provide insight into the maximum temperature available. This location can help gauge if the smoker is achieving the desired heat levels quickly. However, readings closer to the heat source may not be very representative for items being cooked. Precise thermometers can indicate hotspots, providing a full picture of temperature distribution. -
Center of the Smoker:
The center of the smoker provides a balanced reading, often representing the average cooking temperature. This location can be ideal for consistent temperature management rather than overheating or undercooking specific areas. A 2021 survey from Culinary Techniques found that the center consistently gave accurate readings across various smoker types, emphasizing its importance for effective cooking. -
Bottom Racks:
The bottom racks typically experience the lowest temperatures due to heat loss. When monitoring the cooking temperature for food placed at these lower levels, adjustments may be necessary. Studies reveal that temperature discrepancies of up to 20°F can occur between the top and bottom areas. Hence, it’s critical for users to account for these variations when cooking multiple items at once, ensuring each component reaches safe temperatures.
How Can You Maintain Consistent Temperature Throughout Your Smoking Process?
To maintain a consistent temperature throughout your smoking process, use a reliable thermometer, control airflow, manage fuel appropriately, and maintain humidity levels.
A reliable thermometer helps monitor the internal temperature of the smoker accurately. Using digital or probe thermometers can give real-time readings. Accurate temperature measurement aids in making necessary adjustments during smoking.
Controlling airflow is crucial for regulating temperature. Open vents allow more oxygen in, increasing the fire’s intensity and temperature. Conversely, closing vents restrict airflow, lowering the temperature. By adjusting the vents, you can achieve the desired temperature for optimal smoking.
Managing fuel is essential for sustaining heat. Use high-quality charcoal or wood that burns evenly and predictably. Choose the right amount of fuel according to the duration of smoking. If using wood, ensure it is properly seasoned, as wet wood can produce unwanted smoke and temperature fluctuations.
Humidity levels also play a role in temperature consistency. A water pan in the smoker can maintain moisture and stabilize temperature. The water absorbs heat, preventing extreme spikes or drops. Keeping the humidity at around 60-70% helps food retain moisture while smoking.
By focusing on these key factors—thermometer accuracy, airflow control, fuel management, and humidity levels—you can achieve a consistent temperature throughout the smoking process.
Related Post: