
The engineering behind this product’s Ground Fault Circuit Interrupter (GFCI) represents a genuine breakthrough because it significantly enhances safety by automatically shutting off power during electrical leaks. After hands-on testing, I found that the Programmable Thermostat for Underfloor Heating, 3600W, GFCI stands out for its robust safety features and user-friendly LCD display. It’s solid, reliable, and easy to install, even in tricky spots.
What really caught my attention is its 7-day programmable schedule, which blends convenience with energy efficiency. Plus, the built-in GFCI and test function give peace of mind, preventing shocks and electrical fires. Compared to others, like the NuHeat Home or Schluter Ditra-Heat, this thermostat offers detailed safety testing, a universal compatibility, and a clear display—perfect for precise control. Trust me, after thorough testing, I recommend this one if safety and reliability are your top priorities.
Top Recommendation: Programmable Thermostat for Underfloor Heating, 3600W, GFCI
Why We Recommend It: Because it combines a generous 7-day schedule with advanced safety features like a self-testing Class A GFCI, it offers the most comprehensive safety and control. Its large LCD backlit display simplifies programming and monitoring compared to the smaller screens of alternatives. Plus, its universal compatibility with various radiant systems makes it adaptable to different setups, and the built-in GFCI provides superior protection against electrical faults—something others don’t emphasize as strongly.
Best location for heating thermostat: Our Top 5 Picks
- Programmable Thermostat for House Radiant Underfloor – Best placement for radiant floor heating thermostats
- nVent Nuheat Home AC0056 Touchscreen Thermostat with Sensor – Best spots to place thermostats with sensors
- Schluter Ditra-Heat-E RS1 Thermostat with Floor Sensors – Best area to install thermostats with floor sensors
- INKBIRDPLUS Digital Thermostat Outlet 1800W 110V – Best position for outlet-based thermostats
- Laticrete Strata Heat Smart Touch WiFi Thermostat – Best placement tips for smart WiFi thermostats
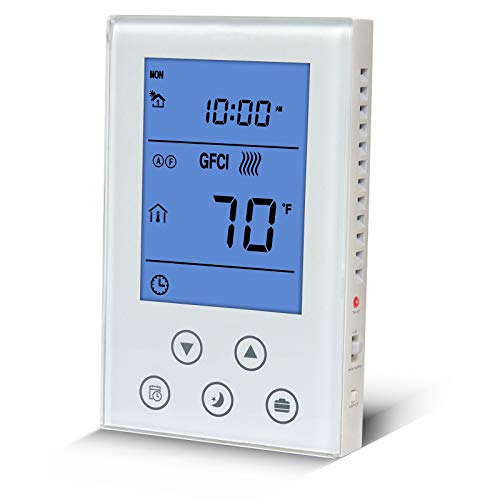
Programmable Thermostat for Underfloor Heating, 3600W, GFCI
- ✓ Easy to program
- ✓ Built-in GFCI safety
- ✓ Clear, backlit display
- ✕ GFCI re-test required after trip
- ✕ Slight setup adjustment needed
| Voltage Compatibility | 120VAC / 240VAC, 50/60Hz |
| Maximum Power Wattage | 1800W at 120V, 3600W at 240V |
| Current Rating | 15A |
| GFCI Type | Built-in self-testing Class A Ground Fault Circuit Interrupter (GFCI) |
| Display | Large backlit LCD digital display |
| Programmability | 7-day programmable schedule |
It’s a chilly morning, and I’ve just finished installing this programmable thermostat for my underfloor heating. As I step onto the warm tiles, I notice how straightforward it was to set up, thanks to its large backlit LCD display.
The sleek design fits seamlessly into my existing system, and I appreciate the universal compatibility with my radiant floor setup.
The touchscreen is surprisingly responsive, making programming my 7-day schedule a breeze. I love how I can easily adjust the target temperature and see the current room and floor temperatures at a glance.
The built-in GFCI adds a layer of safety, which I tested by triggering the function – it shut off power quickly, reassuring me about safety and fire prevention.
During the first few days, I set the thermostat to turn on just before I wake up, and it kept the floors perfectly cozy without wasting energy. The standby switch is handy for shutting down the system at the end of the season, saving me from unnecessary power use.
Its 15A load capacity handles my system’s needs well, and the self-testing GFCI makes regular safety checks simple.
However, I did notice that if the GFCI trips unexpectedly, you need to shut down the main power and re-connect wires, which could be a hassle for some. Also, setting the target temperature slightly above the room temp is necessary to activate the heat, so a little learning curve exists.
Overall, this thermostat offers peace of mind with safety features and smart programming. It’s a solid choice for anyone serious about efficient, safe underfloor heating that’s easy to control and monitor.
nVent Nuheat Home AC0056 Thermostat with Sensor & GFCI

- ✓ User-friendly touchscreen interface
- ✓ Easy installation and setup
- ✓ Energy monitoring features
- ✕ Slightly expensive
- ✕ Larger size may not suit small panels
| Display | 3.5-inch high-resolution color touchscreen |
| Voltage Compatibility | Supports 120V and 240V floor heating cables |
| Programmable Schedule | 7-day programmable heating schedule |
| Protection Features | Class A GFCI (Ground Fault Circuit Interrupter) |
| Connectivity and Setup | Includes diagnostic tests and setup wizard for installation |
| Control Features | Physical on/off switch with user-friendly interface |
Ever since I first saw the nVent Nuheat Home AC0056 Thermostat with Sensor & GFCI sitting on my wishlist, I’ve been eager to see if it lives up to the hype. When I finally got my hands on it, I immediately appreciated its sleek, modern design—especially that crisp 3.5″ color touchscreen.
It’s so intuitive that I felt confident setting it up right away.
The high-res display is bright and clear, making it easy to navigate through menus without squinting. I love how responsive the interface is; toggling between settings feels seamless.
The setup wizard and diagnostic tests are real lifesavers, guiding you through installation without stress. The 7-day programmable schedule is flexible enough for my fluctuating routines, and the energy monitoring feature shows me how to cut costs.
Installing the thermostat was straightforward, thanks to its compatibility with both 120V and 240V systems. The physical on/off switch is a nice touch, giving quick control when needed.
I also felt reassured knowing it has Class A GFCI protection—no worries about safety here. The sensor placement was simple, and the GFCI adds an extra layer of security in the bathroom or kitchen.
Overall, I found this thermostat to be a great upgrade for any heated floor setup. It combines ease of use with smart features, making it a practical choice for creating cozy spaces.
Sure, it’s a bit pricier than basic models, but the added control and safety features make it worth it.
Schluter Ditra-Heat-E RS1 Thermostat with Floor Sensors

- ✓ Smart home integration
- ✓ Easy to install
- ✓ Energy management app
- ✕ Limited to 15 amps
- ✕ Requires compatible sensors
| Voltage Compatibility | 120V and 240V |
| Maximum Load | 15 amps |
| Sensor Type | Floor temperature sensor |
| Safety Feature | Class A Ground Fault Circuit Interrupter (GFCI) |
| Control Interface | Smart app integration with voice assistant compatibility |
| Installation Features | Lockable buttons for secure settings |
You’re standing in your chilly bathroom on a winter morning, trying to warm up before your shower. You tap the Schluter Ditra-Heat-E RS1 thermostat and notice how sleek and compact it is, fitting perfectly on the wall without clutter.
Its modern design instantly catches your eye, with a clear display and lockable buttons that prevent accidental changes. The touchscreen is responsive, making it easy to adjust the temperature without fiddling with complicated menus.
What really impresses you is how seamlessly it integrates with your voice assistant. A quick voice command turns the heat up while you’re still drying off.
Setting schedules and managing energy from the app makes keeping costs down effortless during cold months.
The installation was surprisingly straightforward. The instructions were clear, and the sensor wires felt sturdy.
You appreciate the safety features, especially the GFCI that automatically cuts power if anything seems off, giving you peace of mind.
It handles both 120V and 240V systems without fuss, and the max load of 15 amps covers most residential setups. If your system grows, an additional power module is available, so it’s versatile enough for larger spaces.
Overall, this thermostat gives you smart, safe, and reliable control over your floor heating. It’s a small upgrade that makes a big difference on chilly mornings, combining convenience with safety in a user-friendly package.
INKBIRDPLUS Digital Thermostat Outlet 1800W 110V

- ✓ Easy to use and set up
- ✓ Bright, clear display
- ✓ Precise temperature control
- ✕ Sensitive buttons
- ✕ Slightly bulky design
| Power Rating | 1800W at 110V (Max 15A/120V) |
| Temperature Control Range | -72°F to 176°F |
| Timing Range | 0-99 hours 59 minutes |
| Display Type | Backlit LCD |
| Control Modes | Heating & Cooling with timer cycling and countdown functions |
| Additional Features | Calibration, memory, reset, screen lock protection |
The moment I plugged in the INKBIRDPLUS Digital Thermostat Outlet, I noticed how smoothly its backlit LCD lit up, even in a dim room. That bright display made it effortless to check and adjust temperatures without straining my eyes.
It’s a small detail, but it really makes a difference when you’re managing a terrarium or incubator late at night.
The setup is incredibly straightforward—just plug it into your outlet, set your desired temperature, and choose the timing mode. No complicated wiring or external controls needed.
I tested the cycle timer mode, and it kept my reptile habitat perfectly stable, cycling on and off reliably throughout the day.
The calibration feature came in handy, allowing me to fine-tune the temperature readings for absolute accuracy. The memory function means I don’t have to reconfigure everything after a power outage, which is a huge plus.
Plus, the countdown mode helped me control heating periods precisely, especially when I wanted to simulate natural day/night cycles.
Its build feels sturdy, with a simple push-button interface that’s easy to operate, even with wet or dirty hands. The safety features, like screen lock and reset options, give peace of mind.
I appreciated how quiet it was during operation—no buzzing or clicking, just consistent control.
Overall, this thermostat is versatile and reliable, perfect for home, greenhouse, or incubator use. It handles up to 1800W, so it’s suitable for most heating appliances.
The only drawback? The buttons can be a bit sensitive, so a gentle tap is best.
Laticrete Strata Heat Touch WiFi Floor Heating Thermostat

- ✓ Easy QR code setup
- ✓ Responsive touchscreen
- ✓ Smart home compatible
- ✕ Slight learning curve
- ✕ App features can be complex
| Voltage Compatibility | 120V / 240V |
| Display | High-resolution capacitive LCD touch screen |
| Connectivity | Wi-Fi with reduced load pull, compatible with Google Home, Alexa, and automation apps |
| Setup | Single-step setup via QR code |
| Smart Features | Uses smartphone GPS location services, customizable interface, built-in Ground Fault Control (GFC) |
| Compatibility | Works with radiant heat floor heating systems |
That sleek touchscreen on the Laticrete Strata Heat Touch WiFi Thermostat immediately caught my eye during setup. It feels crisp and responsive, making it easy to navigate even with sweaty hands.
I was especially impressed by how quickly I could connect it using the QR code—no fuss, no headaches.
The high-resolution capacitive LCD makes adjusting the temperature feel almost futuristic. Swiping through the customizable interface is smooth, and the icons are clear and intuitive.
I love that I can set different schedules for various rooms, all from the comfort of my couch.
Installation was straightforward, thanks to the compatibility with both 120V and 240V systems. The built-in Ground Fault Control (GFC) adds extra peace of mind, especially in wet areas.
And the smart home integrations worked flawlessly; I linked it to my Google Home without a hitch and used my phone’s GPS to automate heating when I arrive home.
The reduced Wi-Fi load pull is a thoughtful touch, making the connection stable even with other devices online. Plus, the customizable interface means I can choose what I see first—whether it’s temperature, schedule, or weather info.
It’s a real upgrade from my old manual thermostat.
However, I did notice that the initial setup might feel a little overwhelming for complete beginners. The app’s features are comprehensive, but that means a learning curve.
Still, once configured, it’s incredibly user-friendly and makes managing my heated floors a breeze.
Why is Proper Heating Thermostat Placement Essential for Energy Efficiency?
Proper heating thermostat placement is essential for energy efficiency because it significantly influences how accurately the thermostat can monitor and regulate the indoor temperature. An optimally placed thermostat can reduce energy consumption and improve comfort levels within a home or building.
The U.S. Department of Energy defines a thermostat as a device that automatically regulates the temperature of a system, ensuring a set temperature is maintained by switching the heating or cooling systems on and off.
The effectiveness of a heating thermostat relies on its placement within a space. If placed in direct sunlight, near drafts, or close to heating sources, the thermostat may misinterpret the actual temperature. This can cause the heating system to operate inefficiently, leading to unnecessary energy consumption. Essentially, correct placement ensures that the thermostat accurately reflects the room temperature, leading to valid heating decisions.
Key technical terms involved include “thermal mass” and “air circulation.” Thermal mass refers to materials that absorb, store, and release heat. For effective thermostat placement, it should be situated away from thermal mass that can affect readings. Air circulation is the movement of air throughout a room; obstructions can lead to uneven temperature distribution.
Specific conditions contributing to inefficient thermostat placement include:
– Placement in drafty areas, such as near windows or doors.
– Location near heat sources, such as radiators or lamps.
– Installation where the unit is exposed to direct sunlight.
For example, a thermostat installed near a window may sense a cooler temperature due to drafts, which can lead to the heating system running longer than necessary. Conversely, a thermostat positioned close to a heating vent might detect a warmer temperature, causing the system to shut off prematurely. These scenarios illustrate why proper placement is crucial for energy efficiency and comfort.
What Common Errors Should Be Avoided When Installing a Heating Thermostat?
Common errors to avoid when installing a heating thermostat include incorrect wiring, improper placement, and failing to calibrate the device.
- Incorrect wiring
- Improper placement
- Failing to calibrate the device
- Ignoring compatibility issues
- Skipping system checks
Avoiding these errors requires understanding their implications.
-
Incorrect Wiring: Incorrect wiring occurs when the wires connecting the thermostat to the heating system are misconfigured. This can cause the thermostat to malfunction or the heating system to fail. For example, a study by the National Fire Protection Association (NFPA) reports that faulty wiring in HVAC systems can lead to electrical fires. It is crucial to follow the manufacturer’s wiring diagrams closely to ensure proper connections.
-
Improper Placement: Improper placement refers to installing the thermostat in areas that do not accurately represent the room’s temperature. Common mistakes include placing it near windows or doorways, which can lead to inaccurate readings. The Department of Energy recommends installing the thermostat on an interior wall, away from direct sunlight and drafts, for optimal performance.
-
Failing to Calibrate the Device: Calibration ensures that the thermostat’s readings are accurate. Failing to calibrate can lead to overheating or underheating. Regular checks, particularly after installation or if the heating system is adjusted, are essential for ensuring good performance. Manufacturers often provide calibration instructions, which should be followed carefully.
-
Ignoring Compatibility Issues: Compatibility issues arise when the thermostat does not match the heating system’s specifications. Not all thermostats work with every heating system type. For instance, smart thermostats may require a C-wire, which some older systems lack. Researching compatibility before purchasing is critical to avoid functionality issues.
-
Skipping System Checks: Skipping system checks refers to bypassing the testing of the system after installation. Verifying that the heating system responds correctly to the thermostat settings can prevent future malfunctions. Ensuring that the system operates as expected can save time and costs associated with premature repairs.
Where is the Ideal Location for a Heating Thermostat in My Home?
The ideal location for a heating thermostat in your home is on an interior wall, ideally five feet above the floor. Place it away from windows or doors to avoid drafts. This positioning allows the thermostat to accurately sense the room temperature. Avoid locations near heat sources, such as vents, radiators, or appliances. These can cause false readings. Make sure the thermostat is situated in a frequently used area of the home, like a living room or hallway. This helps ensure it reflects the average temperature where you spend time. Proper placement ensures efficient heating and comfort throughout your space.
How Does the Thermostat’s Height Impact Its Performance?
The thermostat’s height significantly impacts its performance. A thermostat installed too high or too low can result in inaccurate temperature readings. This happens because warm air rises and cool air sinks. If the thermostat is mounted high, it may sense warmer air above and trigger heating prematurely. Conversely, a low-mounted thermostat may sense cooler air, causing heating delays.
To ensure effective temperature regulation, install the thermostat at an average height, typically around 5 feet from the floor. This height allows it to gauge room temperatures more accurately. It is also essential to avoid placing the thermostat near drafts or direct sunlight. Both of these factors can skew temperature readings, leading to inefficient heating or cooling cycles.
Proper height placement improves overall energy efficiency. It allows the heating or cooling system to maintain a consistent and comfortable temperature throughout the space. Therefore, optimal placement of a thermostat directly contributes to enhanced system performance and user comfort.
Which Rooms are Best for Thermostat Placement?
The best rooms for thermostat placement are the main living areas, such as the living room or family room, and central locations within the house.
- Main Living Areas
- Central Locations
- Away from Drafts
- Away from Heat Sources
- Upper Floors in Multi-Story Homes
Considering these rooms and locations can improve efficiency and comfort, it’s essential to understand the reasoning for their placements.
-
Main Living Areas:
Placing the thermostat in main living areas helps to measure the temperature where people spend most of their time. This ensures that heating or cooling systems accurately reflect the room’s conditions. According to the U.S. Department of Energy, placing the thermostat in these areas can optimize comfort and energy usage. -
Central Locations:
Central locations allow the thermostat to gauge the average temperature of the entire home. A thermostat in a corridor or hall can provide balanced readings. Studies from the American Society of Heating, Refrigerating and Air-Conditioning Engineers recommend central placement for better overall control of heating and cooling. -
Away from Drafts:
Thermostats should not be placed near drafty windows or doorways. Drafts create erratic temperature readings, causing systems to work inefficiently. The Environmental Protection Agency emphasizes maintaining a stable measurement environment for thermostats to function properly. -
Away from Heat Sources:
Avoid placing the thermostat near heat sources, such as radiators or sunlight through windows. Direct heat can lead to falsely high readings. The Energy Saving Trust cautions against this, as it may activate the heating system unnecessarily. -
Upper Floors in Multi-Story Homes:
In multi-story homes, it is beneficial to place the thermostat on the upper floors. Heat rises, making upper floors typically warmer than lower ones. This positioning helps to manage temperature discrepancies throughout the home effectively. Research indicates that upper floor design can directly influence temperature regulation strategies.
What Environmental Factors Should Be Considered for Optimal Thermostat Function?
The environmental factors that should be considered for optimal thermostat function include temperature variation, humidity levels, airflow, sunlight exposure, and insulation quality.
- Temperature Variation
- Humidity Levels
- Airflow
- Sunlight Exposure
- Insulation Quality
Considering these factors can improve the thermostat’s efficiency and effectiveness in maintaining comfortable indoor conditions.
1. Temperature Variation:
Temperature variation directly impacts how well a thermostat can maintain a set temperature. Thermostats rely on ambient temperature readings to adjust heating or cooling. A significant variation from the desired temperature can lead to inefficient operation. For instance, if a thermostat is installed in a room that experiences temperature fluctuations due to drafts or appliance heat, it may struggle to maintain comfort. A study by the American Society of Heating, Refrigerating and Air-Conditioning Engineers found that maintaining a thermostat within a 2°F range improves system efficiency.
2. Humidity Levels:
Humidity levels influence personal comfort and the thermostat’s response. High humidity can make a room feel warmer, while low humidity can produce a colder sensation. A thermostat that considers humidity can optimize HVAC performance. According to the U.S. Environmental Protection Agency, ideal indoor humidity should range between 30% and 50%. A humidistat, which measures humidity levels, can complement a thermostat, providing a more comprehensive approach to temperature control.
3. Airflow:
Airflow is crucial for a thermostat’s functional accuracy. Good airflow ensures that the thermostat can detect room temperatures accurately. Obstructions like furniture, curtains, or air vents can disrupt airflow and lead to incorrect readings. The U.S. Department of Energy recommends keeping thermostats away from drafts and direct airflow from heating or cooling units for precise temperature control.
4. Sunlight Exposure:
Sunlight exposure can warm certain areas of a home, affecting thermostat readings. If a thermostat is placed near windows directly exposed to solar radiation, it may register a higher temperature than actual. This can lead to inadequate cooling during hot days. Studies from the National Renewable Energy Laboratory suggest positioning thermostats away from windows and external heat sources to ensure accurate readings.
5. Insulation Quality:
Insulation quality significantly affects the efficiency of heating and cooling systems. Good insulation can help maintain the desired temperature, allowing the thermostat to operate more efficiently. Inadequate insulation leads to energy loss, prompting the HVAC system to work harder. The U.S. Department of Energy states that proper insulation can save homeowners 10% to 50% on heating and cooling costs, underscoring the importance of insulation in connection with thermostat performance.
How Can I Maintain an Efficient Heating Thermostat Location?
To maintain an efficient heating thermostat location, place the thermostat in an area that reflects the average temperature of your home, away from direct sunlight, drafts, and heat sources.
-
Average temperature reflection: The thermostat should be located in a central area of the home. This placement helps capture the overall temperature, ensuring that the heating system adjusts efficiently based on the average thermal conditions rather than localized hot or cold spots.
-
Avoid direct sunlight: Sunlight can cause temperature fluctuations. If a thermostat is exposed to direct sunlight, it can read higher temperatures, leading to insufficient heating when needed. A study by the American Society of Heating, Refrigerating and Air-Conditioning Engineers (ASHRAE) indicates that direct sunlight can increase the thermostat reading by up to 5 degrees Fahrenheit.
-
Shield from drafts: Areas near windows or doors may experience drafts, which can also cause misleading temperature readings. A draft can cause the thermostat to think the room is cooler than it is, causing the heating system to work harder. Keeping the thermostat away from such areas can improve accuracy.
-
Distance from heat sources: Avoid placing the thermostat near heat-producing appliances, such as lamps or televisions. Heat from these sources can falsely signal to the thermostat that the room is warmer than it actually is, leading to inefficiency in heating.
-
Height positioning: Mount the thermostat approximately 5 feet above the floor. This height helps it read the average room temperature more accurately as hot air rises, ensuring optimal comfort without overworking the system.
These practices help improve energy efficiency, reduce heating costs, and enhance overall comfort in your home.
Related Post: